Be.Baking has moved!

You should be automatically redirected in a few seconds. If not, visit
http://bebaking.com and update your bookmarks.

Monday, December 28, 2009

Poppy Seed Roll

Poppy Seed Rolls remind me of my Mom, who I'm missing a lot after a nice holiday visit. Since she's on my mind, I decided to bring the glory of the Poppy Seed Roll to this sweet little blog space.


My Mom’s stories of the delicious Poppy Seed Rolls she ate as a child are missing just one thing: my Grandmother’s recipe. This is obviously a situation that needs to be rectified…

And so, I took it upon myself to create the Poppy Seed Roll of my Mom’s childhood; a softly sweet, bready roll spiraled with lots of poppy seed filling.

You can opt to make or buy poppy seed filling (I’ve had luck with the poppy seed filling made by a company called Solo). However, your most delicious bet is to make the filling yourself, and its actually quite easy. Simply simmer poppy seeds down with some milk, sugar, honey, orange zest, a pinch of salt and a hint of vanilla (raisins are NOT permitted…Mother’s rules). When it tastes delicious, your filling is done.


I recommend wrapping the poppy seed filling up in a light and buttery dough. I like using the same dough I use for Cinnamon Buns, you can find the recipe here: http://bit.ly/7Pd7sj . Next, I roll out the dough, load it up with poppy seed filling, roll it up and then bake it until golden. I like to then paint it with a bit of warmed apricot jam and drizzle on some simple vanilla glaze made of confectioner’s sugar and vanilla extract.


Yum…a soft and light bread full of deliciously sticky poppy seed filling…which is slighty nutty and has a teeny little crunch. The gentle tang from the apricot jam is perfect. If you’ve never tasted a Poppy Seed Roll before, I urge you to try this out...and don’t forget to share the recipe!

Share

Friday, December 18, 2009

A Holiday Cookie Recipe and How to Ship Baked Goods

Egads! The dilemma of the holiday season is upon us: what the heck to get everyone on your list. Well I have an answer for you…and it’s sweet and lovely and involves butter. Simply bake up some delicious goodies, package them ever so cutely, and…presto gifto!


To start you off right in your holiday bake-a-thon, I have a perfect holiday butter cookie recipe to share. This butter cookie is sturdy enough to hold up to extensive decorating and won’t turn to dust if jostled around a bit. It’s also so delicious that you’ll have a hard time giving these cookies away. Of course, if you “accidentally” break a few cookies…well then you’ll just HAVE to eat them yourself.

These cookies are also incredibly versatile. You can cut them out and decorate them with colored sugars, sprinkles and frostings. Or, you can turn them into thumbprint cookies with jam in the middle. Or perhaps you’d like to make them into sandwich cookies? Oh yes, you get to unleash your creative side with these babies.


After you’ve baked your storm of cookies, you can package them in a nice tin and hand them off to a friend that lives nearby. Or, for those people that don’t live so nearby, you can ship these cookies (another reason I love this recipe).

When shipping cookies, you should either wrap each individual cookie in plastic wrap or stack a few together before wrapping (sometimes I like putting the cookies into clear plastic bags instead and tying it with ribbon for a nice presentation). The cookies will need to be packaged together tightly. I like using tissue paper between each cookie/stack of cookies to insulate them.

It’s quite important to include two lines of defense when mailing cookies. You should not only have the box with the cookies inside of it, but also another shipping box. You will also need to pad the internal cookie box from the external one. I like using wadded up paper bags, but I’ve heard of people successfully using air-popped popcorn, bubble wrap or paper shreds as well.

Here’s to holiday gifts full of deliciousness!


Butter Cookies
Adapted from Cook’s Illustrated

2 ½ cups unbleached all-purpose flour
¾ cup sugar
¼ teaspoon salt
2 sticks unsalted butter, cut into 16 pieces and at cool room temperature
2 teaspoons vanilla extract
2 tablespoons cream cheese, cool room temperature

In a stand mixer fitted with the paddle attachment, mix the flour, sugar and salt on low speed until combined. With the mixer running, add the butter one piece at a time; continuing to mix until mixture looks crumbly and slightly wet, about 1 minute longer. Add vanilla and cream cheese and mix on low until dough just begins to form large clumps, about 30 seconds.

Remove dough from mixer and knead by hand in the bowl for 2 or 3 turns to form a cohesive mass. Turn out dough onto counter and divide in half, pat into two 4-inch disks and refrigerate for 20 -30 minutes.

Heat oven to 375 degrees. Roll out dough between parchment paper to 1/8 inch thick, chill for 10 minutes. Cut into desired shapes and place the cookies 1 ½ inches apart on parchment lined cookie sheets. Chill again for about 10 minutes. Bake until light brown, about 10 minutes. Decorate as desired.

Share

Wednesday, December 9, 2009

Low Fat Chocolate Chip Cookies


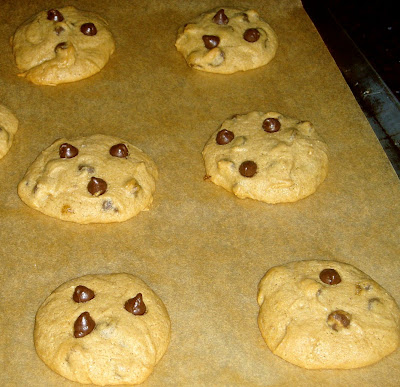
‘Tis the season for holiday cookies! Sugar cookies, molasses cookies, spice cookies, nut cookies, big cookies, small cookies, rolled cookies drop cookies, cookie bars…sheesh…I’ve got a lot of baking to do! Speaking of which, I want to share one of my favorite cookie recipes with you…something to keep in your cookie arsenal for years to come: Chewy Gooey Low Fat Chocolate Chip Cookies.

Yes, you read correctly LOW FAT cookies. Now, before you run for the hills and start cursing my name, please give this recipe a chance. I promise you that it’s not just some cardboardy cookie with the single virtue of being better for you. The number one reason you will love these cookies is because they are fantastically delicious. The low fat bit just makes the package that much sweeter.


This ooh so gooey and chewy chocolate chip cookie recipe is a bit different than a traditional chocolate chip cookie recipe. First, it relies on browned butter (a technique where butter is melted on the stove until it turns light brown and starts smelling nutty). Browning the butter bumps up the buttery flavor meaning you can use less of it while maintaining the same intensity. Also, in order to keep these cookies moist and chewy, dates are used. The dates are chopped up, cooked down and strained so they become a puree (and are undetectable in the final cookie). The dates do not impart any fruit flavor in this cookie, thanks largely to the browned butter.


The rest of the ingredients are more standard…I like to use all dark brown sugar because I like it’s deep intensity. A good amount of vanilla and some salt round out the rest of the flavors and make these cookies out of this world. This is a chocolate chip cookie recipe to replace all others.

Chewy Gooey Low Fat Chocolate Chip Cookies
(adapted from Cook’s County)

1 cup water
4 tablespoons finely chopped dates (I like using Medjool dates)
3 tablespoons butter
2 cups all-purpose, unbleached flour
½ teaspoon baking soda
½ teaspoon salt
1 ¼ cups packed brown sugar (dark or light)
1 large egg
2 teaspoons vanilla extract
½ cup semisweet chocolate chips

Preheat oven to 325 degrees. Line 2 baking sheets with parchment paper.

Bring water to boil in small saucepan and add dates. Simmer until tender and most of the water has evaporated (~20 minutes). Using a rubber spatula, press dates through a fine-mesh strainer into a medium bowl (discard the bits that you can’t get through the strainer). You should have about ¼ cup of the date puree.

Cook butter in a saucepan over medium heat until nutty brown (~4 minutes). Let cool.

Whisk the flour, baking soda and salt in a medium bowl. Set aside.

Beat (with a stand mixer or by hand) the browned butter, brown sugar and date puree in a medium bowl until blended. Beat in the egg and vanilla until combined. Add flour mixture and mix until combined. Reserve 2 tablespoons chips and stir remaining chips into the batter by hand.

Roll 2 tablespoons of dough at a time into balls to get 18 cookies. Space the cookies about 2 inches apart on the cookie sheets. Press the remaining chocolate chips evenly over the cookies.

Bake until the edges are golden brown and center are soft and puffy, 15-18 minutes. Rotate the cookie sheets halfway through baking. Cool cookies completely on baking sheets.

Share

Tuesday, December 1, 2009

French Apple Tart

It took me months to decide on a dessert to make for the Thanksgiving table. Yes, months.

Given my tendency to overdo it when it comes to desserts... **flashback to when I brought 6 different desserts to a mid-day gathering of about 8 people** ...I decided to focus on making just one lovely dessert. A novel idea, I know.


There is something nice about having only one dessert to focus on. I appreciate it more that way and there is no internal battle as to which dessert I want to be my last bite (this is a very important decision if you are me). As long as there is more than enough dessert to go around, having only one dessert available can be liberating.

For Thanksgiving, I wanted to make a fun dessert that was slightly intricate and accessibly fancy. It needed to make sense with the rest of the meal, and leave people pleasantly full, not overly stuffed. And thus began my Thanksgiving dessert debate.


First, I “decided” to make a fluffy Lemon Cake with Meringue Frosting…but no, it was a bit too intense and flashy. Then, I thought about doing a Cardamom Pound Cake with Poached Oranges…but, eh…I wanted something lighter. Maybe a Pear Cranberry and Walnut Pie? No. And on and on it went…

Right about the point when I was even annoying myself with the dessert flip-flopping, I figured it out; a classic and beautiful French Apple Tart. The recipe is from America’s Test Kitchen, so I knew it would be good.

It wasn’t just good, it was scrumptious. The crust was snappy and flaky, the apples were tart and sweetly caramelized. It was exactly what everyone wanted.


You can find the recipe here: http://www.americastestkitchen.com/recipe.asp?recipeids=4530&iSeason=8

Share

Tuesday, November 24, 2009

Peppercorns? In Shortbread?

I have a baking challenge for you. Try using what are normally savory ingredients in a sweet baking application.


Now, I’m only being so commanding because I truly think it will be an enlightening baking adventure. My muse? A Cracked Peppercorn Shortbread success story.

It’s amazing how the taste of something as familiar as pepper changes when introduced into a sweet, crumbly shortbread. It becomes floral and more nuanced…without losing its kick. It’s really something fantastic.


The sky is the limit here, and creativity is key. My next flavor adventure will be a peanut butter and cayenne cookie…and then perhaps a cumin-scented butter cake.

If you want to give the peppercorn shortbread a whirl, I recommend adding about 1 teaspoon finely ground pepper for each cup of flour called for in your favorite shortbread recipe. Try using a variety of peppercorns...I used black, green and white. Then, I sprinkled the top with a mixture of sugar and more cracked pepper. Who knew pepper could be so sweet?

Share

Monday, November 16, 2009

Cardamom and Pear Upside-Down Cake

I have a flavor secret weapon: Cardamom.


It wasn’t until I went to pastry school that I truly discovered and fell in love with Cardamom. In my experience, it’s one of those ingredients that many people have heard of but don’t know how to use…nor are they aware of the magical powers it possesses in the deliciousness department. Cardamom’s flavor is both pungent and sweet, it reminds me of cinnamon, ginger and citrus.


Cardamom is a member of the ginger family and is one of the most expensive spices out there (luckily, a little goes a long way). The most common varieties sold are green and black. I tend towards the green cardamom in baking, but you can use either variety depending on your taste. To me, black cardamom is a bit bitter and has kind of a blunt flavor compared to the green variety.

For maximum flavor, I recommend buying the cardamom in their pods and then grinding it in a spice grinder. You can also find it in powder form but it’s a little iffy as to how strong the flavor will be…it could have been sitting on the grocery store shelves for longer than you’d like to imagine.


Cardamom has a warm and lingering flavor that is full of complexity and is quite wonderful in baked goods. I especially like pairing it with fruit, like pears in this Cardamom and Pear Upside-Down Cake.


Here, the cardamom takes on a very warm and cozy quality that is perfect for dessert tables in the fall and winter months.


Cardamom and Pear Upside-Down Cake
Upside-Down Topping:
2 Bartlett Pears, peeled, cored and cut into ¼ inch slices
½ stick of butter
2/3 cup brown sugar
pinch of salt
2 teaspoons juice from an orange

Cake:
1 cup unbleached all-purpose flour
1 teaspoon baking powder
½ teaspoon salt
¾ cup sugar
¼ cup brown sugar
2 eggs
¾ stick of butter
zest from 1 orange
¾ teaspoon cardamom
½ cup sour cream
1 ½ teaspoons vanilla extract

Heat oven to 350 degrees. Butter the bottom and sides of a 9-inch round cake pan (I used a pan with a removable bottom, but it’s not necessary).

For the Upside-Down Topping:
Heat the butter, brown sugar, salt and orange juice in a skillet over medium heat. Once the butter has melted and all sugar is dissolved, take off the heat and pour mixture into the cake pan.
Arrange the Pear slices overlapping one another on top of the sugar mixture. Set aside.

For the Cake:
Melt the butter with the orange zest and cardamom. Once butter is melted, set aside to cool.
Whisk the flour, baking powder and salt together in a medium bowl. Set aside.
Whisk both sugars and the eggs together in a large bowl until thick and smooth. Slowly whisk in the melted butter mixture until combined. Add sour cream and vanilla and whisk to combine. Add the flour mixture and whisk just to combine.
Pour batter into the pan over the pears and spread evenly. Bake until cake is golden brown, ~35-40 minutes.

Cool in the pan for 20 minutes. Loosen the cake from the pan by running a butter knife or small offset spatula around the inner edge. Place wire rack on top of cake and flip over the cake (you may want to do this over parchment to catch any drips). Gently remove the cake pan and allow to cool completely.

Share

Friday, November 13, 2009

What the Fuyu?


Persimmons are small, squat fruits that look like the offspring of a tomato and a sugar pumpkin. They taste like nothing I’ve had before…sweet like pears or apples with a squash-esque note. Sounds bizarre, but these orange beauties are delicious!

Although there are many different types of persimmons out there, two varieties are seen most often; the Fuyu and the Hachiya. These two types of persimmons look almost identical, but can be identified by their their shape. And, you definitely want to be able to distinguish the two...

The Fuyu persimmons are flat on the bottom and have the best flavor when they are still firm...but don’t get too comfortable munching on firm persimmons. Beware the Hachiya variety. Hachiya persimmons are incredibly tannic and astringent until they have fully ripened. They are heart-shaped and should only be eaten when they are squishy soft (spreadable even). If you eat a Hachiya Persimmon when it’s still firm, your tastebuds will hate you. If you eat it when it’s smushy gushy, your tastebuds will love you.


I’ve got an assortment of persimmons hanging out in my kitchen. The Hachiyas are still too firm to eat, so I’ve been experimenting with the Fuyu variety. Although they are perfectly yummy when eaten like an apple, sometimes it’s fun to add a little variety to the mix…like with this Fuyu Persimmon and Cranberry Compote recipe.


The compote is absolutely delicious, especially over vanilla yogurt with some toasted walnuts scattered on top. This compote is tart and a bit sweet with dried cherry/plum flavors (likely imparted by the wine). What a nice way to treat a Fuyu.

Fuyu Persimmon and Cranberry Compote
3 1/2 cups fresh or frozen cranberries
1 lime, juiced and zested
1/4 cup dry red wine
1/3 to 1/2 cup honey (depending on taste)
1 star anise
1/4 tsp cracked black pepper
Pinch of salt
3-4 Fuyu Persimmons (about 1 lb total), peeled if desired and cut into 1/4-inch dice

Bring all ingredients except the persimmons to a boil in a saucepan, stirring occasionally. Reduce heat and simmer 5 minutes. Discard star anise and stir in persimmons. Enjoy warm or cold.

Share

Sunday, November 8, 2009

Cranberry and Pear Galette


The weather in San Francisco is completely unhelpful when it comes to determining the seasons. If you’re not paying close attention, an entire month can slip away with little trace. I’m still trying to figure out where October went…if it weren’t for the Halloween pictures, I wouldn’t believe it was over.

Well, at least I can count on the produce at the farmers markets to help me (loosely) keep up with the time of year. And, based on the bounty of pears, apples, persimmons, cranberries, squash and pomegranates…well, we’re in the midst of autumn.

The fall and winter months are synonymous with warm fruit desserts. Tender fruit baked with homey spices, perhaps a crisp and nutty topping, a flaky crust, or buttery biscuits that absorb the flowing juices. Perfect with a scoop of ice cream, which immediately starts melting into the fruit creating the most delicious bite. It’s impossible not to slow down for a moment and say “mmmmm”.


Pears and cranberries are a simply lovely combination in fruit desserts. The sweetness of the cooked pears melts into the tart cranberries. Add some frangipane to the mix and you can’t go wrong.

One of my favorite ways to feature fruit in desserts is in the form of a galette, or a free-form pie (think of it as a pie without the pan).

In this version, I used Bartlett Pears which turn from green to golden as they ripen. The flavor of the pears will come through, even if you start with slightly under-ripe pears. This galette is not only beautiful and delicious but as easy as…well, pie.

Cranberry and Pear Galette
For the Crust:
1 stick cold, unsalted butter, cut into ½ inch pieces
3-4 tbsp cold water
1 1/4 cups unbleached all-purpose flour
1 1/2 tsp sugar
1/4 tsp salt

For the filling:
2 Bartlett Pears, cored, peeled if desired, and cut into chunks
1/2 tbsp cornstarch
1/4 cup brown sugar
1/8 tsp cinnamon
1/3 cup fresh or frozen cranberries

1/3 cup slivered blanched almonds
1/4 cup sugar
1/8 teaspoon salt
1/2 stick room-temperature unsalted butter
1 egg
1 Tbsp flour
2 drops almond extract

Heat oven to 400 degrees.

Place the butter pieces in a bowl or plate and freeze for at least 20 minutes. Refrigerate the water in a small cup until needed.

Place the flour, sugar, and salt in the bowl of a food processor and process for 10 seconds to incorporate the ingredients. Add the frozen butter pieces and pulse 6-10 times until the butter and flour mixture looks like crushed crackers and peas.

Immediately transfer the butter-flour mixture to a large bowl. Sprinkle a tablespoon of the cold water of the mixture and fluff it in. Then, add another and another, until 3 tablespoons have been added. Continue to fluff and stir 10 to 12 times. It will not be a cohesive dough at this point, but before bringing it together, you need to test for the correct moisture content. Take a handful of the mixture and squeeze firmly. Open you hand if the clump falls apart and looks dry, add a bit more water (one teaspoon at a time). The dough is done when it holds together (even if a few small pieces fall off). If the butter feels soft and squishy, refrigerate before continuing. If it’s still cold and firm, continue to the next step.

Turn the dough onto a work surface and gently knead 3-6 times. Flatten the dough into a 6 inch disk and wrap in plastic wrap and refrigerate for 30 minutes.

For the filling, put the pears, cornstarch brown sugar and cinnamon in a bowl and toss together. Set aside. Grind the almonds with the sugar and salt in a food processor until the almonds are finely ground. Add the softened butter and process (scrape down from food processor sides if needed). Add eggs one at a time, making sure first egg is thoroughly mixed before adding the next. Add the flour and almond extract and mix well.

Dust a work surface with flour and set the disk of dough on the flour. Dust the top with flour and roll it out until you’ve got a14-15 inch circle bout 1/8 inch thick. Fold the dough circle into quarters and transfer to a sheet pan, then unfold dough.

Put the almond mixture in the center of the dough leaving a 3 inch margin on all sides. Mound the pear mixture on top of the almond mixture and then put the cranberries on top.

Fold the excess dough up over the fruit in a clockwise direction until the fruit is enclosed (there should be about 4-6 inches of exposed fruit in the middle).

Chill the galette in the refrigerator for 20 minutes.

Bake for 30-35 minutes until crust is golden brown and the filling is bubbling.

Share

Sunday, November 1, 2009

Halloween Macarons and Mini Pizzas

Here's hoping your Halloween was happy and delicious!


Nick and I went to a Halloween potluck party hosted by a couple of our dear friends. We dressed as Betty Crocker and Chef Boyardee. I’ll let you figure out who was who…

For the party, I made Orange French Macarons filled with Grand Marnier Ganache. They were BooooOOoooozie…


Nick also decided to bake for the party, and gave homemade pizza a try (using the pizza dough recipe from my last post). He made mini pizzas with a homemade pomegranate BBQ sauce, cheddar cheese and cilantro.


Those are some treats worth sinking your teeth into!

Monday, October 26, 2009

Homemade Pizza

When I was growing up, my Mom made pizza fairly often. I picture her standing in the kitchen with smudges of flour all over her shirt, buzzing her Cuisinart to make pizza dough. I liked helping top the pizzas, almost always opting for mushrooms, onions and red pepper. Oh, and some fresh basil if we had it. Then, Mom would slide the doughy beauties into the oven.


The baking pizza smelled yeasty, sweet and herby with a cheesy tang. If I could have eaten the air coming out of the kitchen, I would have.

Just thinking about my Mom’s homemade pizza makes me want to hop on a plane to Illinois. Since I can’t do that every time I need a homemade pizza fix, I've learned to make it myself.

Pizza is relaxed and comfy…put whatever you’re craving on top of it, and enjoy it with people you love.


Pizza Dough

¼ cup warm water (110-115 degrees)
2 ¼ teaspoons active dry yeast, or 1 ¾ teaspoons instant yeast
1 cup water
3 tablespoons olive oil
3 ¼ bread flour (or All Purpose)
1 ½ teaspoons salt
Semolina or finely ground cornmeal

Pour the warm water into the bowl of a stand mixer. Add the yeast, whisk by hand to blend, and allow the mixture to sit for 5-10 minutes, until the yeast is activated and looks creamy. Add the 1 cup water and 3 tablespoons olive oil and whisk by hand. Add the flour and salt. Knead the dough on low speed for 2 minutes. Cover the bowl with plastic wrap and let the dough rest for 20 minutes. Turn the mixer to medium-low and continue to knead until the dough is firm, elastic and smooth (3-6 minutes).

Lightly oil a tub or bowl and scrape the dough in. Brush a little oil over the surface of the dough and then cover tightly with plastic wrap and let the dough rise at room temp until doubled in size, about 45-60 minutes.

Place a baking or pizza stone (if you have one) in the oven. Preheat the oven to 500 degrees. Give the oven at least 30 minutes to an hour to fully heat the stone, so you get a beautiful crispy crust.

Punch the dough down very gently to expel some of the bubbles. Then, turn the dough onto a lightly floured counter. Dust the top of the dough lightly with flour, then press down with your fingers to flatten the dough into a disk about 12 inches in diameter (you can use a rolling pin if you like).

Top the pizza with whatever deliciousness you have in mind. Center your pizza on a baking sheet that has been dusted with Semolina. You can bake your pizza on the sheet, or slide it directly onto the pizza stone.

Bake for 7-9 minutes until the dough is golden at the edges and bottom (use a spatula to slide under the pizza to check the bottom).

Tuesday, October 20, 2009

Sweet Bookery: "The Sweet Life in Paris" by David Lebovitz


Good friends, good food and good books…all together in one place. You can’t get much better than a pastry-inspired book club. Sweet Bookery includes some of the kindest, funniest and smartest people I know; my former pastry school classmates.

The first book we read was The Sweet Life in Paris by pastry chef and author, David Lebovitz. It’s a funny and endearing story about his move from San Francisco to Paris, and his experiences living as an American in Paris (with a heavy emphasis on the food). The book is full of hilarious anecdotes, words of advice and helpful tidbits. Not to mention some awesome recipes (both sweet and savory).

Since the book is full of fantastic recipes, it seemed logical to whip up a few for the meeting. I made his French Chocolate Macarons, which were less finicky than many other Macaron recipes. They had that wonderful crispy-chewy texture that is characteristic of a Macaron, and were lusciously chocolaty.


I also made some American Macaroons, which seemed appropriate given the context of the book. I used a David Lebovitz recipe for this as well (although it was from his website instead: http://bit.ly/25RXWh).


A fantastic Fig-Olive Tapenade recipe was both savory and sweet with a bit of crunch from the fig seeds that was unexpected and pleasant. I served it with Rosemary bread from the bakery where I work.


The recipe in the book for Spiced Nut Mix is out of this world good, and is a perfect sort of snack. It’s a tad spicy, slightly sweet, salty and crunchy. It’s also a lovely topping for ice cream.


A few of the other book club members brought some desserts from the book (drat! I didn’t get a chance to get any pictures of those tasty morsels).

Now, we are trying to decide what book to read next. It’s got a lot to live up to…

Thursday, October 15, 2009

Chocolate-Banana Marble Bread


I’m not very good at following recipes. I don’t start out trying to be a recipe rebel but once I get into the kitchen, I tend to stray from the written word.

Yes, yes, you’re right that baking is incredibly scientific and you have to be careful with your tinkering. But, if you know a bit of the “why” behind what you’re doing and have a slightly daring spirit, you should be able to twist a recipe and get something yummy. And if it tastes like an old man’s boot…well, we learn from our mistakes!


My most recent recipe interpretation was for Chocolate-Banana Marble Bread. I know the original recipe is a good one because I tried it (a good starting point). Plus, I had some over-ripe bananas in the freezer that I wanted to clear out. The freezer is a good trick if you have bananas that are super-ripe but don’t have time to bake. All you need to do is peel them, stick them in a sealed plastic baggie and put them in the freezer.


The first thing I did to the marble bread recipe was add a bit of salt. I add salt to all baking recipes if they don’t include it, just a pinch of it boosts the flavors of everything else - your final product won’t taste salty…just more delicious.

In the original recipe, there was more butter than there needed to be. I decided to brown the butter in a small saucepan over low heat to pump up the butter flavor while using less of it (a great trick I got from America’s Test Kitchen). Since I had removed some of the butter but wanted to ensure that the final product was still moist, I decided to use a bit more buttermilk than the recipe called for and substitute half of the total sugar with brown sugar. Another issue I had with the original recipe was that it didn’t call for any actual chocolate (just cocoa powder). I’m a chocolate fiend so the chocolate omission needed to be addressed, and what better way than with chocolate chips?!


Speaking of chocolate chips…I’ve had a hard time finding really delicious chocolate chips. It’s easy to see the word “chocolate” and sort of trick yourself into thinking they taste good, but lots of the brands out there don’t! I did a taste test at home and was disappointed by the majority of the brands on the shelves. My favorite brand of chocolate chips at the local Whole Foods Market are made by the company “Enjoy Life”. The chocolate chips are mini, which I actually prefer in most baked goods…the proportions end up juuuuust right.


Out of the oven, all warm and toasty. Chocolate! Bananas! Joy!

The recipe I came up with is below…please tweak it to your liking.

Chocolate-Banana Marble Bread
(Thanks to Cindy Mushet for the recipe upon which this one is based)

3 very ripe medium sized bananas, peeled and at room temp
½ cup buttermilk
¼ teaspoon salt
2 teaspoons vanilla extract
1 cup sifted pastry flour
1 cup sifted all purpose flour (you can use 2 sifted cups of all purpose flour if you don’t have pastry flour)
1 teaspoon baking soda
¾ teaspoon baking powder
¼ cup cocoa powder (Dutch-process or natural is fine…I used natural)
3 tablespoons boiling water
6 Tablespoons butter
½ cup sugar
½ cup brown sugar
2 large eggs, slightly beaten
¾ cup mini chocolate chips

Preheat the oven to 350 degrees.

Lightly coat a 9x5 loaf pan with melted butter or high-heat canola spray and line it with a piece of parchment that extends 1 inch beyond the long edges of both sides of the pan (this will make it easy to take the bread out of the pan).

Put butter in a small saucepan over low-moderate heat and swirl the pan as the butter melts and starts to brown…when the butter starts to smell slightly nutty and the color darkens to amber, take it off the heat and let it cool (if you burn the butter…and you’ll know if you do…start over or your marble bread will taste bitter).

Sift the flours, baking soda, baking powder and salt into a large bowl. Set aside. Put the coca powder in a small bowl and pour the boiling water over it until it forms a smooth paste. Set aside.

Put the bananas in the bowl of a food processor and process to a smooth puree (or just mash them with a fork). Transfer the puree to a large bowl and add the sugars, buttermilk, cooled browned butter, vanilla, and eggs and whisk until just blended.

Make a well in the center of the dry ingredient mixture and add the wet ingredients, gently mix until just blended...mix only until there aren’t any white pockets of flour.

Transfer half of the batter to a medium sized bowl, add the cocoa paste and gently but thoroughly blend it together.

Fold half of the chocolate chips into the light batter and half into the dark batter.

Drop alternating spoonfuls of the dark and light batters into the prepared pan, then “marbelize” it by using a spoon to gently turn the batter over in 3 places down the length of the pan (you’re essentially folding the two colors of batter into one another).

Bake for 55-65 minutes, until firm to the touch and a toothpick comes out clean. Transfer to a rack and cool completely. When cool, remove from pan, peel off parchment and cut slices using a serrated knife.

Sunday, October 4, 2009

Orange Pecan Cinnamon Swirl


I had some time on my hands, was feeling generous and know how Nick loves cinnamon buns. And so, I decided to bake up a delicious breakfast bread for him to bring to work…a riff on the sweet cinnamon buns he adores.

I started by making my favorite breakfast dough recipe. This dough is easy to put together and an absolute dream to work with. The only thing to watch out for with this dough is to make sure that the butter is room temp before incorporating it into the dough. If it’s not, it won’t incorporate smoothly and will take a bit more work.


Once the dough was smooth and silky, I rolled it out and filled it with orange zest, cinnamon, brown sugar, and toasted pecans (toasting nuts brings out a much stronger, richer flavor). I then rolled up the dough like I was making cinnamon buns, but then switched gears a bit. I wrapped it into a circle and cut slits 2 inches apart. Then I turned up these wedges so the filling was visible.

While it was baking, the whole apartment smelled of sweet cinnamon and I got an overwhelming feeling of comfort and “home”.

And then, out of the oven it came, and after some contemplation, I christened it “Orange Pecan Cinnamon Swirl”. I let it cool briefly and then drizzled an orange glaze over the top.


Lucky for me there was still one piece left when Nick came home that evening. It’s funny how people often feel bad taking the last piece of anything. If there’s a piece of something delicious left and I want to eat it…well, I see that as fate.

Turns out, the Orange Pecan Swirl was just as yummy for dessert as for breakfast.

For this recipe, go to the end of my post on August 28th and add the zest of 1 orange and 1 cup of toasted pecans to the filling, and substitute orange juice for the water in the glaze.

Sunday, September 27, 2009

Gateau Marjolaine

I laughed, I cried, I ended up with a cake…not an uncommon sequence of events in my world.


When I’m in the middle of baking a recipe involving lots of finicky components (like some sort of layer cake), I will likely reach a point when I debate scrapping the whole messy project and heading downstairs to the Whole Foods Bakery instead.

Cakes that include lots of layers and fillings almost always look bad before they look good, at least mine do. The Gateau Marjolaine, a cake with multiple layers, is a perfect example.

The Gateau Marjolaine is a cake for special occasions, and the recipe I’m familiar with consists of layers of Dacquoise (a meringue that is baked like a cake) that is then layered with chocolate ganache, coffee buttercream (or hazelnut praline buttercream) and almond cream. It is covered with rich chocolate ganache and toasted almonds or hazelnuts. Sounds delicious…and really, it is…but it’s creation isn’t always pretty…


I started losing faith in my Gateau Marjolaine fairly quickly…the cake layers were crumbling before me as I tried to smooth the fussy fillings into place. Instead of setting up as I had envisioned, the buttercreams created a sort of slip and slide with the cake. And then, there was the matter of the ganache. It had become a magnet for my clothing and was getting all over the place. I even found some in my pocket.


Luckily, I regained control of my Marjolaine mishap by putting the entire thing into the fridge and taking some deep cleansing breathes. The fridge is a good sort of time-out for unruly baking projects. It straightens things out a bit and gives the baker some more control.

After much mayhem, frustration, and eventual delight, the Gateau Marjolaine was deliciously worthwhile.

Friday, September 18, 2009

Banana Apple Muffins with Cinnamon Walnut Crunch


I am in a strange sort of limbo this week. I felt so clever when I put in my two weeks notice so that my last ho-hum day at my ho-hum office job would be one week before my first happy day at my first happy pastry place.

Having this time off seemed utterly divine and blissful as I was looking forward to it. I envisioned myself spending my days lounging on the couch, enrobed in fine linens while nibbling bonbons, with not a care in the world…

But, when Monday actually rolled around, the reality of it all was quite annoying. I realized that my couch isn’t very comfortable, I don’t have fine linens to wrap myself in, and eating too many bonbons gave me a splitting headache and made me cranky. Oh yeah, and I was lonely.

So, I did what makes me feel better…I baked something. And for me, there is really nothing cozier than baking muffins.


I had some over-ripe bananas and some lovely pink lady apples around, so I decided to put that combo together and sprinkle the top with a tasty cinnamon-walnut crunch. Luckily, these muffins cheered me up and were just as wonderful as I had imagined.

Banana Apple Muffins with Cinnamon Walnut Crunch
Makes 12 muffins

For the muffins:
3 medium very ripe bananas, mashed
1 pink lady apple, chopped into ¼ inch dice (I like the skin on, but do whatever makes you happy)
1 ¼ cups all purpose flour
½ cup whole wheat flour
½ cup cinnamon apple instant oatmeal (or any flavor you like…if you don’t have this around, you can just add an additional ¼ cup of flour instead)
¾ cup brown sugar
1 ½ teaspoons cinnamon
1/8 teaspoon ground ginger
1/8 teaspoon nutmeg
Pinch of salt
2 teaspoons baking powder
½ teaspoon baking soda
½ stick of butter, melted and cooled
2/3 cups milk (I used 1%)
2 large eggs, room temperature
2 teaspoons vanilla extract

For the Cinnamon Walnut Crunch:
*This makes more than you’ll need…use the rest to much on or put on top of yogurt.
1 egg white
¼ cup sugar
1 tsp cinnamon
1 ½ cups coarsely chopped walnuts

To make the Cinnamon Walnut Crunch:

Preheat oven to 300 degrees. Whisk egg white until frothy, then whisk in sugar and cinnamon. Fold in the nuts. Spread on parchment-lined sheet tray and bake for ~12 minutes, until beginning to dry. Stir to break up nuts. Continue to bake until nuts and coating are dry and golden brown, about 10 minutes. Cool and finely chop.

To make the Banana Apple Muffins:

Turn up the oven to 350 degrees (after the walnut crunch is done). In a large bowl, combine the flours, oatmeal, brown sugar, baking powder, baking soda, cinnamon, nutmeg, ground ginger and salt and whisk to mix well. In another large bowl, combine the mashed bananas, melted but cooled butter, milk, eggs and vanilla and mix well.

Make a well in the center of the dry ingredients. Pour the banana mixture into the well and stir gently with a rubber spatula. Mix only until there are no more streaks of flour or pools of liquid and the batter looks fairly smooth. A few small lumps scattered throughout are fine. Gently fold in the apple pieces until evenly distributed.

Grease muffin tin or line with 12 paper liners. Fill each spot ¾ full with batter. Sprinkle Cinnamon Walnut Crunch evenly on top. Bake muffins for ~17-20 minutes or until a wooden toothpick inserted in the center comes out clean.

Monday, September 14, 2009

Pastry School Graduation


The past week was a whirlwind of flying sugar and flour. Amidst it all, I somehow got it together enough to present my final pastry project (champagne in hand) and graduate from pastry school.

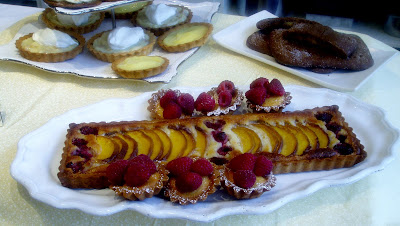
The final project was a neat assignment. Each student came up with an idea for a dessert table they felt represented their pastry persona, and then got to create it and present at graduation. Fifteen hours of baking later, there were a lot of beautiful cakes and lovely set-ups.


Because I have completely fallen for tarts, I knew I wanted my project to be a sort of ode to these lovely sweets. I also decided to have a fruit or nut (or both) component in every one of my tarts to express my love for these ingredients. One of the hardest things for me was narrowing down my tart menu. I finally figured it out…
Plum Tart
Peach and Raspberry Tart
Raspberry Frangipane Tarts
Bittersweet Chocolate Tarts with Almond Crust
Lemon Poppy Seed Tarts
Coconut and Peach Tarts with Rum Whipped Cream
Caramelized Banana Pecan Linzer Tarts
Gingersnap-Peach Poptarts


Before starting in on the baking, I created a timeline for my tart project. I knew that it was going to be a challenge to get everything finished in time, and that I would likely be cursing my own name. I was right…I was still in the back of the kitchen with a torch in hand bruleeing bananas when the first guests started arriving.

In a tart fervor, everything (except for a Lemon Poppy Seed Tart I forgot in the fridge) made it to the front table.


I feel oh, so bittersweet about graduating. It’s sad to leave the comfort and warmth of my San Francisco school where I got to play with ingredients and test recipes. But, I’m also excited to take the next step.

So here I go, off to bake full time...

Oh, and I'm including the Plum Tart recipe in case you care to join in on the fun.

A Plum Tart Indeed

Almond Tart Dough:
1 1/4 cups all purpose flour
1/2 cup slivered blanched almonds
1/4 cup sugar
1/4 teaspoon salt
1 stick chilled unsalted butter, cut into pieces
1/4 teaspoon almond extract
~2 tablespoons ice water

Blend flour, almonds, sugar and salt in processor until nuts are finely ground. Add butter and cut in using on/off turns until mixture resembles coarse meal. Mix in almond extract and enough water to form moist clumps. Knead dough briefly on work surface to combine; flatten into disk. Wrap in plastic; refrigerate until firm before rolling, at least 2 hours and up to 1 day.

Preheat oven to 375°F. Roll out crust dough on lightly floured surface to 13-inch round. Transfer dough to 9-inch-diameter tart pan with removable bottom. Gently press dough into tart pan; trim excess and dock the bottom of the dough with a fork. Freeze crust 15 minutes.

Bake the crust 10 minutes. Continue to bake until crust is pale golden, about 12 minutes. Cool crust for about 15 minutes.

Filling:
3/4 cup slivered blanched almonds
1/2 cup sugar
1/8 teaspoon salt
1 stick room-temperature unsalted butter
2 eggs
2 Tbsp flour
2-3 drops almond extract
4 large plums, pitted and cut into thin slices

Grind the almonds with the sugar and salt in a food processor until the almonds are finely ground. Add the softened butter and process (scrape down from food processor sides if needed). Add eggs one at a time, making sure first egg is thoroughly mixed before adding the next. Add the flour and almond extract and mix well.

Fill cooled tart shell with almond filling, leaving 1/4 inch margin on the rim of the pastry (this leaves room for filling to expand). Then, push plum slices into the filling and bake at 375 degrees for 35-45 minutes until nicely browned. Transfer to a rack.

Glaze:
1/4 cup apricot preserves
2 teaspoons water


Stir apricot jam with the water in small saucepan over medium heat until mixture boils. Strain the glaze into small bowl. Brush glaze generously over plums. Cool tart completely.