Be.Baking has moved!

You should be automatically redirected in a few seconds. If not, visit
http://bebaking.com and update your bookmarks.

Showing posts with label Tart. Show all posts

Tuesday, December 1, 2009

French Apple Tart

It took me months to decide on a dessert to make for the Thanksgiving table. Yes, months.

Given my tendency to overdo it when it comes to desserts... **flashback to when I brought 6 different desserts to a mid-day gathering of about 8 people** ...I decided to focus on making just one lovely dessert. A novel idea, I know.


There is something nice about having only one dessert to focus on. I appreciate it more that way and there is no internal battle as to which dessert I want to be my last bite (this is a very important decision if you are me). As long as there is more than enough dessert to go around, having only one dessert available can be liberating.

For Thanksgiving, I wanted to make a fun dessert that was slightly intricate and accessibly fancy. It needed to make sense with the rest of the meal, and leave people pleasantly full, not overly stuffed. And thus began my Thanksgiving dessert debate.


First, I “decided” to make a fluffy Lemon Cake with Meringue Frosting…but no, it was a bit too intense and flashy. Then, I thought about doing a Cardamom Pound Cake with Poached Oranges…but, eh…I wanted something lighter. Maybe a Pear Cranberry and Walnut Pie? No. And on and on it went…

Right about the point when I was even annoying myself with the dessert flip-flopping, I figured it out; a classic and beautiful French Apple Tart. The recipe is from America’s Test Kitchen, so I knew it would be good.

It wasn’t just good, it was scrumptious. The crust was snappy and flaky, the apples were tart and sweetly caramelized. It was exactly what everyone wanted.


You can find the recipe here: http://www.americastestkitchen.com/recipe.asp?recipeids=4530&iSeason=8

Share

Sunday, November 8, 2009

Cranberry and Pear Galette


The weather in San Francisco is completely unhelpful when it comes to determining the seasons. If you’re not paying close attention, an entire month can slip away with little trace. I’m still trying to figure out where October went…if it weren’t for the Halloween pictures, I wouldn’t believe it was over.

Well, at least I can count on the produce at the farmers markets to help me (loosely) keep up with the time of year. And, based on the bounty of pears, apples, persimmons, cranberries, squash and pomegranates…well, we’re in the midst of autumn.

The fall and winter months are synonymous with warm fruit desserts. Tender fruit baked with homey spices, perhaps a crisp and nutty topping, a flaky crust, or buttery biscuits that absorb the flowing juices. Perfect with a scoop of ice cream, which immediately starts melting into the fruit creating the most delicious bite. It’s impossible not to slow down for a moment and say “mmmmm”.


Pears and cranberries are a simply lovely combination in fruit desserts. The sweetness of the cooked pears melts into the tart cranberries. Add some frangipane to the mix and you can’t go wrong.

One of my favorite ways to feature fruit in desserts is in the form of a galette, or a free-form pie (think of it as a pie without the pan).

In this version, I used Bartlett Pears which turn from green to golden as they ripen. The flavor of the pears will come through, even if you start with slightly under-ripe pears. This galette is not only beautiful and delicious but as easy as…well, pie.

Cranberry and Pear Galette
For the Crust:
1 stick cold, unsalted butter, cut into ½ inch pieces
3-4 tbsp cold water
1 1/4 cups unbleached all-purpose flour
1 1/2 tsp sugar
1/4 tsp salt

For the filling:
2 Bartlett Pears, cored, peeled if desired, and cut into chunks
1/2 tbsp cornstarch
1/4 cup brown sugar
1/8 tsp cinnamon
1/3 cup fresh or frozen cranberries

1/3 cup slivered blanched almonds
1/4 cup sugar
1/8 teaspoon salt
1/2 stick room-temperature unsalted butter
1 egg
1 Tbsp flour
2 drops almond extract

Heat oven to 400 degrees.

Place the butter pieces in a bowl or plate and freeze for at least 20 minutes. Refrigerate the water in a small cup until needed.

Place the flour, sugar, and salt in the bowl of a food processor and process for 10 seconds to incorporate the ingredients. Add the frozen butter pieces and pulse 6-10 times until the butter and flour mixture looks like crushed crackers and peas.

Immediately transfer the butter-flour mixture to a large bowl. Sprinkle a tablespoon of the cold water of the mixture and fluff it in. Then, add another and another, until 3 tablespoons have been added. Continue to fluff and stir 10 to 12 times. It will not be a cohesive dough at this point, but before bringing it together, you need to test for the correct moisture content. Take a handful of the mixture and squeeze firmly. Open you hand if the clump falls apart and looks dry, add a bit more water (one teaspoon at a time). The dough is done when it holds together (even if a few small pieces fall off). If the butter feels soft and squishy, refrigerate before continuing. If it’s still cold and firm, continue to the next step.

Turn the dough onto a work surface and gently knead 3-6 times. Flatten the dough into a 6 inch disk and wrap in plastic wrap and refrigerate for 30 minutes.

For the filling, put the pears, cornstarch brown sugar and cinnamon in a bowl and toss together. Set aside. Grind the almonds with the sugar and salt in a food processor until the almonds are finely ground. Add the softened butter and process (scrape down from food processor sides if needed). Add eggs one at a time, making sure first egg is thoroughly mixed before adding the next. Add the flour and almond extract and mix well.

Dust a work surface with flour and set the disk of dough on the flour. Dust the top with flour and roll it out until you’ve got a14-15 inch circle bout 1/8 inch thick. Fold the dough circle into quarters and transfer to a sheet pan, then unfold dough.

Put the almond mixture in the center of the dough leaving a 3 inch margin on all sides. Mound the pear mixture on top of the almond mixture and then put the cranberries on top.

Fold the excess dough up over the fruit in a clockwise direction until the fruit is enclosed (there should be about 4-6 inches of exposed fruit in the middle).

Chill the galette in the refrigerator for 20 minutes.

Bake for 30-35 minutes until crust is golden brown and the filling is bubbling.

Share

Monday, September 14, 2009

Pastry School Graduation


The past week was a whirlwind of flying sugar and flour. Amidst it all, I somehow got it together enough to present my final pastry project (champagne in hand) and graduate from pastry school.

The final project was a neat assignment. Each student came up with an idea for a dessert table they felt represented their pastry persona, and then got to create it and present at graduation. Fifteen hours of baking later, there were a lot of beautiful cakes and lovely set-ups.


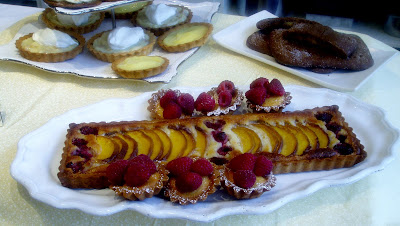
Because I have completely fallen for tarts, I knew I wanted my project to be a sort of ode to these lovely sweets. I also decided to have a fruit or nut (or both) component in every one of my tarts to express my love for these ingredients. One of the hardest things for me was narrowing down my tart menu. I finally figured it out…
Plum Tart
Peach and Raspberry Tart
Raspberry Frangipane Tarts
Bittersweet Chocolate Tarts with Almond Crust
Lemon Poppy Seed Tarts
Coconut and Peach Tarts with Rum Whipped Cream
Caramelized Banana Pecan Linzer Tarts
Gingersnap-Peach Poptarts


Before starting in on the baking, I created a timeline for my tart project. I knew that it was going to be a challenge to get everything finished in time, and that I would likely be cursing my own name. I was right…I was still in the back of the kitchen with a torch in hand bruleeing bananas when the first guests started arriving.

In a tart fervor, everything (except for a Lemon Poppy Seed Tart I forgot in the fridge) made it to the front table.


I feel oh, so bittersweet about graduating. It’s sad to leave the comfort and warmth of my San Francisco school where I got to play with ingredients and test recipes. But, I’m also excited to take the next step.

So here I go, off to bake full time...

Oh, and I'm including the Plum Tart recipe in case you care to join in on the fun.

A Plum Tart Indeed

Almond Tart Dough:
1 1/4 cups all purpose flour
1/2 cup slivered blanched almonds
1/4 cup sugar
1/4 teaspoon salt
1 stick chilled unsalted butter, cut into pieces
1/4 teaspoon almond extract
~2 tablespoons ice water

Blend flour, almonds, sugar and salt in processor until nuts are finely ground. Add butter and cut in using on/off turns until mixture resembles coarse meal. Mix in almond extract and enough water to form moist clumps. Knead dough briefly on work surface to combine; flatten into disk. Wrap in plastic; refrigerate until firm before rolling, at least 2 hours and up to 1 day.

Preheat oven to 375°F. Roll out crust dough on lightly floured surface to 13-inch round. Transfer dough to 9-inch-diameter tart pan with removable bottom. Gently press dough into tart pan; trim excess and dock the bottom of the dough with a fork. Freeze crust 15 minutes.

Bake the crust 10 minutes. Continue to bake until crust is pale golden, about 12 minutes. Cool crust for about 15 minutes.

Filling:
3/4 cup slivered blanched almonds
1/2 cup sugar
1/8 teaspoon salt
1 stick room-temperature unsalted butter
2 eggs
2 Tbsp flour
2-3 drops almond extract
4 large plums, pitted and cut into thin slices

Grind the almonds with the sugar and salt in a food processor until the almonds are finely ground. Add the softened butter and process (scrape down from food processor sides if needed). Add eggs one at a time, making sure first egg is thoroughly mixed before adding the next. Add the flour and almond extract and mix well.

Fill cooled tart shell with almond filling, leaving 1/4 inch margin on the rim of the pastry (this leaves room for filling to expand). Then, push plum slices into the filling and bake at 375 degrees for 35-45 minutes until nicely browned. Transfer to a rack.

Glaze:
1/4 cup apricot preserves
2 teaspoons water


Stir apricot jam with the water in small saucepan over medium heat until mixture boils. Strain the glaze into small bowl. Brush glaze generously over plums. Cool tart completely.

Thursday, September 3, 2009

Plating Desserts - A Sugar Plum Tartlet and a Nectarine Tea Cake


Plating desserts is such fun! You get to experiment with different textures, flavors, temperatures, colors, and shapes with results that are delicious and make people happy. All in all, I suppose it’s really just playtime with sweets.

It’s incredible how the same dessert component can morph depending on how it’s plated. Take a simple piece of chocolate cake for example…it could be cut in a triangle, or a circle or a rectangle…could be filled or not, have a sauce or not, be on a square plate or an oval plate or in a glass…and so on…forever.

However fun it can be, plating desserts is challenging. Although it might be easy to think up a bazillion plating ideas, when it comes to the actual dessert architecture, well that’s an entirely different story. The plate is too big, the cake isn’t the right shape, the sauce is too thick, ARGH.

Last week in class, we were given a stocked pantry (full of fruits, nuts and sauces) and were told to create two plated desserts.


The first dessert I put up was a Sugarplum and Chocolate Meringue Tartlet with Cocoa Nib Cookie Crumbs and Caramel Ice Cream.


The second dessert was a Nectarine Tea Cake and a Stone Fruit-Pistachio Verrine with Browned Butter and Rum Cream. A verrine is a layered dessert that is similar to a parfait.


Since dessert plating can induce mild anxiety attacks in the pastry-obsessed, it’s nice to have some pointers:

Go for odd numbers:
Put 1 or 3 cookies on the plate instead of 2 or 4.
Balance is important but don’t be rely on symmetry: If you put a raspberry on one side of the plate, maybe put a few chopped nuts on the other side on a slight angle, or just leave it blank.
Try out different heights and shapes: Combine circles with lines and swooshes, etc.
Use interesting vessels: Try putting a custard in a jar or using a pretty glass or interesting looking plate, it’ll make a big difference.
Use a variety of textures and temperatures: Try to have something crunchy, something smooth, something warm and something cold on the plate.
The magic number 3: On a basic level, try to include the main dessert, a sauce and a garnish on each plate.
If you can’t eat it: Don’t put it on the plate…no matter how pretty it is.
Don’t put anything on the plate that isn’t in the main dessert: Just say NO to the random mint leaf!

Happy Plating!

Thursday, July 16, 2009

Rainier Cherry and Almond Frangipane Tart

Rainier Cherries should be celebrated and experienced by all. These aren’t your typical red cherries (which I do love as well), but are a bit more unique and lesser known. They are bigger than most cherries and are yellowish-orange-pinky-red…the colors all sort of swirled together like a beautiful sunset.


Rainier Cherries have a taste that stands up to their beauty. They have a subtle tartness that is softened and made even more delicious by the extra sweet juiciness of their mellow flesh. They are the stage for a very sophisticated balance of flavors that make them intensely appealing…they taste like something both familiar and new.

What better way to show off these fruit jewels than in a lovely tart? A tart that is fruit forward, tastes delicious and is perfectly summer. A Rainier Cherry and Almond Frangipane Tart. Now, how does that sound?

This tart has the sort of rustic, homey appeal of a pie…with refined touches that make it a bit more elegant.


The crust is made with almond flour, which gets deep and nutty when baked. It plays nicely with the Almond Frangipane filling which has a lighter, gentle almond taste.

The cherries are pushed into the uncooked Frangipane filling and the whole tart is then popped into the oven to bake. About 35 minutes later, out comes a lush, beauty of a tart. It is Rainier Cherry Perfection, and simple to make too.


Rainier Cherry and Almond Frangipane Tart

Almond Tart Dough:
1 1/2 sticks butter
1 cup sugar
1 1/4 cups cake flour
1 cup "AP" (All Purpose) flour
1/2 cups almond flour
1 large egg
1/8 tsp salt

Cut butter into 1" pieces and freeze for 15 minutes.

Sift together sugar, cake flour, AP flour and almond flour into the bowl of a stand mixer with a paddle attachment. Add butter, mix on low speed for 2 minutes, or until the butter is the size of broken walnut meats. Stop the machine and by hand pinch flat any large pieces of butter that remain.

Combine egg and salt in a small bowl and mix well. Turn mixer on low speed and add egg all at once. Mix until dough just comes together. If too dry, add 1-2 Tbsp ice cold water. Dough should be tacky but not sticky.

Wrap dough in plastic and chill for 1 hour (or up to 3 days).

Roll out dough and line pan. Refrigerate for 10 minutes. Fill tart shell with parchment paper and pie weights. Blind bake in a 350 degree oven for 10 minutes, then remove pie weights and parchment, and bake another 10 minutes until lightly golden. Cool.

Filling:
3/4 cup almonds (blanched are recommended, but not necessary)
1/2 cup sugar
1 stick softened butter
2 eggs
2 Tbsp flour
2-3 drops almond extract
~15 Rainier Cherries, pitted and cut in half

Grind the almonds with the sugar in a food processor until the almonds are finely ground. Add the softened butter and process (scrape down from food processor sides if needed). Add eggs one at a time, making sure first egg is thoroughly mixed before adding the next. Add the flour and almond extract and mix well.

Fill cooled tart shell with almond filling, leaving 1/4 inch margin on the rim of the pastry (this leaves room for filling to expand). Then, push cherry halves into the filling (skin side up) and bake at 375 degrees for 30-40 minutes until nicely browned. Let cool on a rack.

Three Tarts: Fresh Fruit with Vanilla Cream, Warm Bittersweet Chocolate, and Lemon-Lime Meringue


I am fantastically amused by Food Challenge/Competitions TV shows…I get quite involved (some might say too involved)… commenting incessantly, getting overjoyed when my favorite Chef wins, and flustered when a contestant does something I deem foolish (who in their right mind would attempt a Crème Brulee in 15 minutes?!?).

My amusement towards these shows is wrapped with curiosity….how would I fare in such competitions? Well, during Saturday’s Pastry Class, I got a little taste (I can’t resist throwing in a food pun now and again). Christa divided the students into teams, which were our “Bakeries”. One person on each team was assigned as the Pastry Chef, and the others were their assistants.

I got to be the Pastry Chef, which was energizing. First item of business, our bakery needed a name. It turned out that the first name initials of my teammates and I were P, B and J. How perfect! We decided to pay homage to that cozy little sandwich and be the “PB&J Bakery”.

Our fairy tale bakery was given a list of orders to complete, which included three tarts (each with a listed time for pick up by the customer) and multiple batches of Croissant dough which we would bake during the next class. [*Aside* I will write a post on Croissants in the near future. They are butterly magnificent, and a lesson in food science as well.]


Back to PB&J Bakery….our first order was for a Fruit Tart with a Dark Chocolate lined crust, a Vanilla Bean Custard filling and fresh Fruit decorating the top. When we were an hour away from the supposed “pick-up” time, we were told that the client had called and would be coming half an hour early. We had to scramble a bit, but we got our Fruit Tart done just in time. The dark chocolate lining on the crust is an excellent twist…it brings more balance and elegance to the flavor. The vanilla custard is comforting and rich, with the lightness of fresh fruit on top. It’s really outstanding.


Next, we had an order for a Warm Bittersweet Chocolate Tart, which makes me weak in the knees just thinking about…it is just THAT delicious. The filling is intense, not overly sweet, but incredibly rich and smooth. The crust has nuttiness from the almonds in the dough, and a delightful crunch that works perfectly with the creamy filling. We had to expedite this tart too for another hurried customer who showed up ahead of schedule. We got the tart done on time, but we wanted to do more with the decoration on top…I will admit that the flower petals are hiding a less than perfect design.


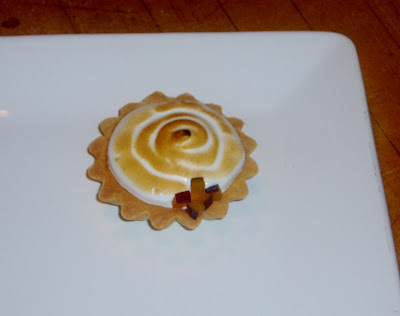
Our third order was for a Lemon-Lime Meringue Tart. I like the Lemon-Lime combination…the lime gives the filling an extra zing, and the meringue is light and marshmallow-like. After baking off the filling and topping it with meringue, we got out the blow torch to brown the top (please note that the browning can be done in the oven if you don’t have a blow torch laying around…). The blow torch is quite touchy and can do a LOT of damage in a small about of time if you aren’t careful…I ended up scorching some parts of the meringue (I even created a small fizzling almost-fire at one point)….but in the end, it turned out to be lovely. We successfully got the tart out in time, thus completing all orders for the day. I was happily exhausted in the end…I wonder what will come next.


I'm including the recipe of the Fruit Tart, which I've adapted below. If you are interested in any of the other tart recipes, email me and I'll send them along.

Fruit Tart
Dough:
1 2/3 cups flour
1/8 tsp salt
1 Tbsp sugar
9 Tbsp cold butter, cut into 1” cubes
1 egg yolk
3-5 Tbsp ice water (depending on dough consistency)

Dark Chocolate (62%), melted over a water bath (this is for painting the baked and cooled tart shell...I didn’t measure this when I did it. Just use your best guess and if you have leftover chocolate, dip some fruit or cookies in it for later)

Vanilla Custard filling:
6 egg yolks
1 cup sugar
¼ tsp salt
4 Tbsp flour
4 Tbsp cornstarch
2 cups scalded milk (which means the milk is heated up until it is right below a boil, then use it)
1 Tbsp butter
1 ½ tsp Vanilla Extract, or ½ Vanilla Bean (If you are using the vanilla bean, use a paring knife to cut a full vanilla bean in half lengthwise. Then, using the dull side of the knife, scrape out the seeds to use. You can put the unused vanilla bean pod with the seeds removed into a bag of sugar and *presto* Vanilla Sugar at your service!)
2 Tbsp Kirsch or Cognac (if desired)

Top:
1 cup red currant jelly or apricot preserves
2 Tbsp sugar
2 Tbsp Kirsh or Cognac (if desired)
Fresh Fruit (berries, kiwis, mango, grapes, cherries, etc.)

Make the dough:
Mix the flour, salt and sugar in a medium bowl. Cut in the butter with a pastry blender until the butter globs are the size of peas and crushed crackers (don’t over-mix or crust will be tough). Mix the egg yolk with 3-5 Tbsp cold water in a small bowl. Stir this into flour mixture with a fork. Bring the dough together with your fingers (very gently) and turn onto a counter. Using the heel of your hand, smear parts of the dough across the counter once (this is called “fraisage”). Mound the dough back together with a bench scraper. Do this 3 times to bring the dough together with minimal handling. Wrap in waxed paper or plastic wrap and press into a disc shape. Chill for ~30 minutes.

Line tart pan with dough:
Preheat oven to 375 degrees Roll dough to 1/8” think and lay carefully over a 9” tart pan. Cut off excess dough, leaving a 1” border. Reinforce the edges with the extra dough and pinch off any extra that you don’t use. Prick the base with a fork. Chill again for 10 minutes. Fill unbaked tart shell with parchment paper and pie weights, then blind bake the shell for 15-18 minutes. Remove pie weights and bake another 10-12 minutes until golden and fully cooked. Cool completely.

Make the Vanilla Custard filling:
In a bowl, beat (using a whisk) the egg yolks until sticky, gradually add the sugar and beat until thick. Beat in the flour, cornstarch, and salt. Then gradually pour in the scalded milk, still beating. Pour this mixture into the saucepan (add the ½ vanilla bean if using) and bring to a boil over moderate heat, stirring constantly with a wooden spoon. Keep mixture at boil for 1 minute (still stirring constantly) as it thickens. Then, remove from heat, beat in the butter and the vanilla extract (if not using the vanilla bean) and Kirsch or Cognac. Strain into a bowl, cover with plastic wrap (so that the wrap is touching the top of the custard) and chill.

Brush melted chocolate onto baked and cooled tart shell and let harden (only cover the bottom and internal sides of the tart shell with chocolate, but leave the top edge as is).

Make Glaze (to brush on top of fruit once tart is compiled):
Heat jelly or preserves the sugar and Kirsch or Cognac.

Once chocolate is set, fill the tart with the Vanilla Custard and top it with fresh fruit (making sure to crowd the fruit on in whatever design pleases you). Then, using a pastry brush, glaze the top of the fruit (do this for all fruit except for raspberries…which repels the glaze and makes it look beady).

Thursday, April 23, 2009

Ups and Downs in Tartville


Monday night’s Pastry Class was a haze of heat, butter, and emotional turmoil.  Not only was it was the first 80+ degree day of the year in San Francisco, but we made Tarts…more specifically, Tart dough.  Tart dough is mostly made of butter and needs to be kept chilled…or else the butter melts…excessively.    Case in point, our teacher Christa couldn’t even convince her dough to cooperate during the demo.  Instead, the dough just started sticking to everything it could attack and oozed around the counter.  This is the point we all should have fled the scene screaming.  But instead, we stuck around to be TARTured (sorry, when it comes to food puns, I just can’t help myself). 

The basic formula for the Tart au Citron  (-aka- Lemon Tart) with a Pate Sucree crust (a sweet and flaky crust) I was assigned:

1.        1. Make the tart dough (8 oz. butter, ½ cups sugar, 2 egg yolks, pinch of salt, 3 cups flour, 2 tablespoons heavy cream) and divide it in half to make two tart shells.

2.        2. CHILL

3.       3. Roll dough out and cut into the exact circle size of the tart pan

4.       4. CHILL

5.       5. Put dough in your tart pan perfectly (which is harder than it sounds)

6.       6. CHILL

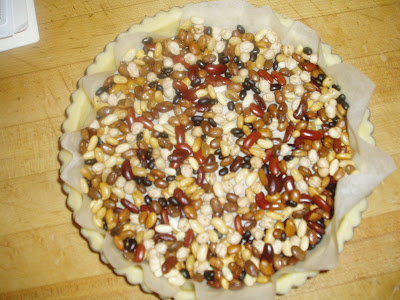
7.       7. “Blind-bake” the dough, meaning you need to cover your dough with parchment and dried beans (to weigh it down) which allows the crust to bake a little so it won’t be soggy when you add the filling

8.       8. Fill the tart with a beautiful home-made lemon curd

9.       9. Bake the whole tart (the filling needs to be baked too).

The recipe seemed so straightforward, but proved difficult as an 80 degree day led to a 90 degree kitchen…with ovens blasting at 375 and chefcoat-clad students involuntarily playing slip and slide on buttery tart dough. I felt like a drunken hyena suffering from a mild case of heat stroke…and I was somehow supposed to be coordinated enough to create a delicate Lemon Tart?

As I was verbally abusing my tart dough, things were awry around me.   One tart shell plunged to an untimely death as it was being removed from the oven…its flaky remains a perfect symbol for the evening. 

Simultaneously, an oven started expelling smoke and the dried beans (being used to "Blind-Bake" the filling-less tart shells) began fumigating the room with an unpleasant, too-earthy odor. The overall kitchen vibe was laughably spastic. 

It was about 9:15pm when I realized that there was no way I was going to have everything done in time for plating and presenting (at 9:30).  I was heading high speed towards a perfect tart pan ZERO of an evening.  By nothing short of a small miracle, I did manage to finish one lousy tart pan of baked dough (which Christa pointed out was slightly under-baked)…not exactly a brag-worthy evening.  I had to leave the remaining tart components I had partially finished in the fridge for next class.


Update:  It is now Thursday evening, and I am happy to report that I have made a full recovery from the Tart Disaster of 2009. Christa, feeling sorry for her defeated students, held a Tart Re-Do Class.  It effectively restored the Pastry Morale, and gave everyone a second chance to create an elegant, beautiful, and impressive tart. The combination of intense cravings for tarts, and the fear of second failure proved beneficial.  I found myself baffled by how wonderful all the tarts looked and tasted…it leaves me daydreaming (and drooling) over what delicious creations are up next.