Be.Baking has moved!

You should be automatically redirected in a few seconds. If not, visit
http://bebaking.com and update your bookmarks.

Showing posts with label Recipe. Show all posts

Wednesday, December 9, 2009

Low Fat Chocolate Chip Cookies


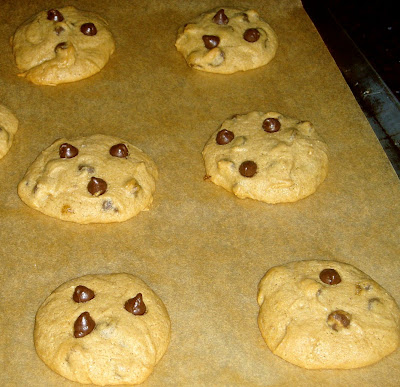
‘Tis the season for holiday cookies! Sugar cookies, molasses cookies, spice cookies, nut cookies, big cookies, small cookies, rolled cookies drop cookies, cookie bars…sheesh…I’ve got a lot of baking to do! Speaking of which, I want to share one of my favorite cookie recipes with you…something to keep in your cookie arsenal for years to come: Chewy Gooey Low Fat Chocolate Chip Cookies.

Yes, you read correctly LOW FAT cookies. Now, before you run for the hills and start cursing my name, please give this recipe a chance. I promise you that it’s not just some cardboardy cookie with the single virtue of being better for you. The number one reason you will love these cookies is because they are fantastically delicious. The low fat bit just makes the package that much sweeter.


This ooh so gooey and chewy chocolate chip cookie recipe is a bit different than a traditional chocolate chip cookie recipe. First, it relies on browned butter (a technique where butter is melted on the stove until it turns light brown and starts smelling nutty). Browning the butter bumps up the buttery flavor meaning you can use less of it while maintaining the same intensity. Also, in order to keep these cookies moist and chewy, dates are used. The dates are chopped up, cooked down and strained so they become a puree (and are undetectable in the final cookie). The dates do not impart any fruit flavor in this cookie, thanks largely to the browned butter.


The rest of the ingredients are more standard…I like to use all dark brown sugar because I like it’s deep intensity. A good amount of vanilla and some salt round out the rest of the flavors and make these cookies out of this world. This is a chocolate chip cookie recipe to replace all others.

Chewy Gooey Low Fat Chocolate Chip Cookies
(adapted from Cook’s County)

1 cup water
4 tablespoons finely chopped dates (I like using Medjool dates)
3 tablespoons butter
2 cups all-purpose, unbleached flour
½ teaspoon baking soda
½ teaspoon salt
1 ¼ cups packed brown sugar (dark or light)
1 large egg
2 teaspoons vanilla extract
½ cup semisweet chocolate chips

Preheat oven to 325 degrees. Line 2 baking sheets with parchment paper.

Bring water to boil in small saucepan and add dates. Simmer until tender and most of the water has evaporated (~20 minutes). Using a rubber spatula, press dates through a fine-mesh strainer into a medium bowl (discard the bits that you can’t get through the strainer). You should have about ¼ cup of the date puree.

Cook butter in a saucepan over medium heat until nutty brown (~4 minutes). Let cool.

Whisk the flour, baking soda and salt in a medium bowl. Set aside.

Beat (with a stand mixer or by hand) the browned butter, brown sugar and date puree in a medium bowl until blended. Beat in the egg and vanilla until combined. Add flour mixture and mix until combined. Reserve 2 tablespoons chips and stir remaining chips into the batter by hand.

Roll 2 tablespoons of dough at a time into balls to get 18 cookies. Space the cookies about 2 inches apart on the cookie sheets. Press the remaining chocolate chips evenly over the cookies.

Bake until the edges are golden brown and center are soft and puffy, 15-18 minutes. Rotate the cookie sheets halfway through baking. Cool cookies completely on baking sheets.

Share

Thursday, July 16, 2009

Rainier Cherry and Almond Frangipane Tart

Rainier Cherries should be celebrated and experienced by all. These aren’t your typical red cherries (which I do love as well), but are a bit more unique and lesser known. They are bigger than most cherries and are yellowish-orange-pinky-red…the colors all sort of swirled together like a beautiful sunset.


Rainier Cherries have a taste that stands up to their beauty. They have a subtle tartness that is softened and made even more delicious by the extra sweet juiciness of their mellow flesh. They are the stage for a very sophisticated balance of flavors that make them intensely appealing…they taste like something both familiar and new.

What better way to show off these fruit jewels than in a lovely tart? A tart that is fruit forward, tastes delicious and is perfectly summer. A Rainier Cherry and Almond Frangipane Tart. Now, how does that sound?

This tart has the sort of rustic, homey appeal of a pie…with refined touches that make it a bit more elegant.


The crust is made with almond flour, which gets deep and nutty when baked. It plays nicely with the Almond Frangipane filling which has a lighter, gentle almond taste.

The cherries are pushed into the uncooked Frangipane filling and the whole tart is then popped into the oven to bake. About 35 minutes later, out comes a lush, beauty of a tart. It is Rainier Cherry Perfection, and simple to make too.


Rainier Cherry and Almond Frangipane Tart

Almond Tart Dough:
1 1/2 sticks butter
1 cup sugar
1 1/4 cups cake flour
1 cup "AP" (All Purpose) flour
1/2 cups almond flour
1 large egg
1/8 tsp salt

Cut butter into 1" pieces and freeze for 15 minutes.

Sift together sugar, cake flour, AP flour and almond flour into the bowl of a stand mixer with a paddle attachment. Add butter, mix on low speed for 2 minutes, or until the butter is the size of broken walnut meats. Stop the machine and by hand pinch flat any large pieces of butter that remain.

Combine egg and salt in a small bowl and mix well. Turn mixer on low speed and add egg all at once. Mix until dough just comes together. If too dry, add 1-2 Tbsp ice cold water. Dough should be tacky but not sticky.

Wrap dough in plastic and chill for 1 hour (or up to 3 days).

Roll out dough and line pan. Refrigerate for 10 minutes. Fill tart shell with parchment paper and pie weights. Blind bake in a 350 degree oven for 10 minutes, then remove pie weights and parchment, and bake another 10 minutes until lightly golden. Cool.

Filling:
3/4 cup almonds (blanched are recommended, but not necessary)
1/2 cup sugar
1 stick softened butter
2 eggs
2 Tbsp flour
2-3 drops almond extract
~15 Rainier Cherries, pitted and cut in half

Grind the almonds with the sugar in a food processor until the almonds are finely ground. Add the softened butter and process (scrape down from food processor sides if needed). Add eggs one at a time, making sure first egg is thoroughly mixed before adding the next. Add the flour and almond extract and mix well.

Fill cooled tart shell with almond filling, leaving 1/4 inch margin on the rim of the pastry (this leaves room for filling to expand). Then, push cherry halves into the filling (skin side up) and bake at 375 degrees for 30-40 minutes until nicely browned. Let cool on a rack.

Three Tarts: Fresh Fruit with Vanilla Cream, Warm Bittersweet Chocolate, and Lemon-Lime Meringue


I am fantastically amused by Food Challenge/Competitions TV shows…I get quite involved (some might say too involved)… commenting incessantly, getting overjoyed when my favorite Chef wins, and flustered when a contestant does something I deem foolish (who in their right mind would attempt a Crème Brulee in 15 minutes?!?).

My amusement towards these shows is wrapped with curiosity….how would I fare in such competitions? Well, during Saturday’s Pastry Class, I got a little taste (I can’t resist throwing in a food pun now and again). Christa divided the students into teams, which were our “Bakeries”. One person on each team was assigned as the Pastry Chef, and the others were their assistants.

I got to be the Pastry Chef, which was energizing. First item of business, our bakery needed a name. It turned out that the first name initials of my teammates and I were P, B and J. How perfect! We decided to pay homage to that cozy little sandwich and be the “PB&J Bakery”.

Our fairy tale bakery was given a list of orders to complete, which included three tarts (each with a listed time for pick up by the customer) and multiple batches of Croissant dough which we would bake during the next class. [*Aside* I will write a post on Croissants in the near future. They are butterly magnificent, and a lesson in food science as well.]


Back to PB&J Bakery….our first order was for a Fruit Tart with a Dark Chocolate lined crust, a Vanilla Bean Custard filling and fresh Fruit decorating the top. When we were an hour away from the supposed “pick-up” time, we were told that the client had called and would be coming half an hour early. We had to scramble a bit, but we got our Fruit Tart done just in time. The dark chocolate lining on the crust is an excellent twist…it brings more balance and elegance to the flavor. The vanilla custard is comforting and rich, with the lightness of fresh fruit on top. It’s really outstanding.


Next, we had an order for a Warm Bittersweet Chocolate Tart, which makes me weak in the knees just thinking about…it is just THAT delicious. The filling is intense, not overly sweet, but incredibly rich and smooth. The crust has nuttiness from the almonds in the dough, and a delightful crunch that works perfectly with the creamy filling. We had to expedite this tart too for another hurried customer who showed up ahead of schedule. We got the tart done on time, but we wanted to do more with the decoration on top…I will admit that the flower petals are hiding a less than perfect design.


Our third order was for a Lemon-Lime Meringue Tart. I like the Lemon-Lime combination…the lime gives the filling an extra zing, and the meringue is light and marshmallow-like. After baking off the filling and topping it with meringue, we got out the blow torch to brown the top (please note that the browning can be done in the oven if you don’t have a blow torch laying around…). The blow torch is quite touchy and can do a LOT of damage in a small about of time if you aren’t careful…I ended up scorching some parts of the meringue (I even created a small fizzling almost-fire at one point)….but in the end, it turned out to be lovely. We successfully got the tart out in time, thus completing all orders for the day. I was happily exhausted in the end…I wonder what will come next.


I'm including the recipe of the Fruit Tart, which I've adapted below. If you are interested in any of the other tart recipes, email me and I'll send them along.

Fruit Tart
Dough:
1 2/3 cups flour
1/8 tsp salt
1 Tbsp sugar
9 Tbsp cold butter, cut into 1” cubes
1 egg yolk
3-5 Tbsp ice water (depending on dough consistency)

Dark Chocolate (62%), melted over a water bath (this is for painting the baked and cooled tart shell...I didn’t measure this when I did it. Just use your best guess and if you have leftover chocolate, dip some fruit or cookies in it for later)

Vanilla Custard filling:
6 egg yolks
1 cup sugar
¼ tsp salt
4 Tbsp flour
4 Tbsp cornstarch
2 cups scalded milk (which means the milk is heated up until it is right below a boil, then use it)
1 Tbsp butter
1 ½ tsp Vanilla Extract, or ½ Vanilla Bean (If you are using the vanilla bean, use a paring knife to cut a full vanilla bean in half lengthwise. Then, using the dull side of the knife, scrape out the seeds to use. You can put the unused vanilla bean pod with the seeds removed into a bag of sugar and *presto* Vanilla Sugar at your service!)
2 Tbsp Kirsch or Cognac (if desired)

Top:
1 cup red currant jelly or apricot preserves
2 Tbsp sugar
2 Tbsp Kirsh or Cognac (if desired)
Fresh Fruit (berries, kiwis, mango, grapes, cherries, etc.)

Make the dough:
Mix the flour, salt and sugar in a medium bowl. Cut in the butter with a pastry blender until the butter globs are the size of peas and crushed crackers (don’t over-mix or crust will be tough). Mix the egg yolk with 3-5 Tbsp cold water in a small bowl. Stir this into flour mixture with a fork. Bring the dough together with your fingers (very gently) and turn onto a counter. Using the heel of your hand, smear parts of the dough across the counter once (this is called “fraisage”). Mound the dough back together with a bench scraper. Do this 3 times to bring the dough together with minimal handling. Wrap in waxed paper or plastic wrap and press into a disc shape. Chill for ~30 minutes.

Line tart pan with dough:
Preheat oven to 375 degrees Roll dough to 1/8” think and lay carefully over a 9” tart pan. Cut off excess dough, leaving a 1” border. Reinforce the edges with the extra dough and pinch off any extra that you don’t use. Prick the base with a fork. Chill again for 10 minutes. Fill unbaked tart shell with parchment paper and pie weights, then blind bake the shell for 15-18 minutes. Remove pie weights and bake another 10-12 minutes until golden and fully cooked. Cool completely.

Make the Vanilla Custard filling:
In a bowl, beat (using a whisk) the egg yolks until sticky, gradually add the sugar and beat until thick. Beat in the flour, cornstarch, and salt. Then gradually pour in the scalded milk, still beating. Pour this mixture into the saucepan (add the ½ vanilla bean if using) and bring to a boil over moderate heat, stirring constantly with a wooden spoon. Keep mixture at boil for 1 minute (still stirring constantly) as it thickens. Then, remove from heat, beat in the butter and the vanilla extract (if not using the vanilla bean) and Kirsch or Cognac. Strain into a bowl, cover with plastic wrap (so that the wrap is touching the top of the custard) and chill.

Brush melted chocolate onto baked and cooled tart shell and let harden (only cover the bottom and internal sides of the tart shell with chocolate, but leave the top edge as is).

Make Glaze (to brush on top of fruit once tart is compiled):
Heat jelly or preserves the sugar and Kirsch or Cognac.

Once chocolate is set, fill the tart with the Vanilla Custard and top it with fresh fruit (making sure to crowd the fruit on in whatever design pleases you). Then, using a pastry brush, glaze the top of the fruit (do this for all fruit except for raspberries…which repels the glaze and makes it look beady).

Sunday, July 12, 2009

Brioche


Oh my…Brioche. What a delicious and surprisingly simple bread to make. Brioche is buttery and soft with sweet and savory undertones that make it absolutely delicious on its own or as a companion to other tastes, textures and flavors.

Brioche is deliciously comforting straight out of the oven spread with a bit of orange marmalade, the bitterness of the orange peel cradled by the soft, lush buttery bread. Or, crisped in a pan as a sandwich filled with smoked gouda and roasted red peppers…the cheese oozing and gooing out the middle. And of course, it makes one of the most deliciously fluffy and decadent French toast slices you’ve ever tasted.

We often see Brioche baked into loaves, but Brioche à tête is the classical shape for this bread. It includes forming the dough into balls that are stacked in fluted tins with one small dough ball placed on top. It’s important to note that Brioche dough is quite sticky and can turn chaotic. It tries to take control of your life (or it at least resists the whole rolling situation) if it isn’t tamed by an adequate amount of flour.


The formed dough is then allowed to proof before being egg washed and baked.


When Brioche comes out of the oven, it is shiny and golden with a soft aroma that begs you to indulge in a nibble.


Taking the extra time to make and use a pre-ferment when baking up a batch of Brioche encourages a more distinct and delicious taste. The below recipe is a fantastic Brioche that is sure to make you and your eaters very happy.

Brioche
(Jeanie Brown)

Pre-ferment
105 grams flour
70 grams water
¼ tsp instant yeast

Mix together on low speed for 4 minutes and leave at room temp for 12 hours (75 degrees)

For the dough
105 grams of the pre-ferment
315 grams flour (AP or Bread)
70 grams water
1 Tb + 1 tsp instant yeast
1 ¼ tsp salt
160 grams butter (cold but pliable, take from fridge and pound with rolling pic
190 gr. Eggs (~3 ½…don’t count the shells)
3 Tbsp Sugar

Egg wash (just an egg beaten with a fork will do)

Add all ingredients to the mixer except the butter. Mix with dough hook on 1st speed for ~5-10 minutes until the dough is full developed (it should be shiny and string-like as it pulls away from sides of the bowl).
Gradually add the cold butter, slowly at first, over the period of 15-20 minutes on second speed (just break off bits of butter and throw it in…and yes, it does need to take that long to achieve the perfect texture…just be patient).
Let rise for 90 minutes.
Chill overnight.
Shape dough as desired, place in buttered pans and proof for about 60 minutes. Egg wash and then bake in a 350 degree oven (that was preheated to 375 degrees but turned down as soon as the bread goes in) for ~16-20 minutes.

Tuesday, July 7, 2009

Raisin, Rosemary, and Cinnamon Focaccia


On lazy weekend mornings, I often wake up with dreams of baking still swirling around in my head, like the steam coming off a hot cup of coffee. Sometimes, I’m so enticed by these thoughts of baking that I eagerly pop out of my warm, cozy bed and prance into the kitchen. I swing my apron on over my pajamas, preheat the oven, and start playing with flour and sugar.

Baking in the morning is such a gentle and lovely way to start the day. The aromas fill the house (or tiny San Francisco apartment) with happiness and the promise of something delicious, soon to be enjoyed.

This past weekend, I decided to do a little advance planning and try out a recipe I’d been thinking about for awhile: Raisin, Rosemary and Cinnamon Focaccia. Although you can complete the entire Focaccia recipe in one day, you’d have to wake up before the sun to get it baked off in time for breakfast or brunch. I prefer that the sun wakes up before I do, so I put together most of the recipe on Saturday for a Sunday bake.


First I plumped the Raisins in hot water for about 5 minutes, which heightens the lush, juiciness of the Raisins in the final bread. I like to do this step with most dried fruits that I bake with to ensure that the fruits are tender and delicious…it is simply too disappointing to take a bite into an irresistible bread…only to discover that it is dotted with hard, unappealing dried fruits. Next, I proofed the yeast in warm milk and mixed in the dry ingredients. This Focaccia recipe has milk in it instead of the more traditional water, so it has a softer and more tender crumb than most (the fat in the milk coats the gluten strands in the flour so they can’t link together as easily, resulting in a more tender bread). I then left the yeast to do its magic, and waited for the dough to double in size (about an hour and a half).


I then punched the dough blob down and shaped it on a sheet tray. Then I brushed the top lightly with olive oil, covered it with plastic wrap and slid it into the fridge for later. On Sunday morning, all I had to do was sprinkle the top with some Turbinado Sugar (bigger, crunchier crystals than table sugar) and pop it into the oven.


The resulting Focaccia is softly sweet and full of juicy Raisins that are nicely balanced by the crunchy Turbinado Sugar baked into the crust. The deep fruitiness of the Raisins is enriched further by the Cinnamon and Rosemary, which not only taste delicious but smell simply divine. This Focaccia is worth the time.


This focaccia recipe was written originally to be done in a KitchenAid Mixer, but I adapted these instructions to do it without one. If you are the lucky owner of a KtichenAid, then proceed as instructed below but reduce all kneading times by about 2 minutes. Also, be sure to scrape sides of bowl and turn dough occassionally while kneading.

Raisin, Rosemary and Cinnamon Focaccia
(adapted from “The Art and Sould of Cooking” by Cindy Mushet)

2 cups plump sweet raisins
2 ¼ cups warm milk (I used 2%) heated to 110-115 degrees
1 teaspoon sugar
1 Tablespoon active dry yeast, or 2 ¼ teaspoons instant yeast
5 cups bread flour (or AP Flour)
3 Tablespoons olive oil, plus additional for brushing
2 bunches fresh rosemary, leaves removed and very finely chopped (about 1/3 cup)
1 ½ teaspoons ground cinnamon
1 teaspoon salt
2-3 Tablespoons Turbinado sugar


To plump raisins: Place in saucepan with water to cover. Bring water to boil, then turn off heat, cover pan, and let raisins sit for 5 minutes. Drain the raisins in the colander set in the sink and shake off any excess water. Spread raisins on baking sheet and cool.

Mix and Knead the dough: Combine warmed milk and sugar in large bowl and sprinkle the yeast on the top. Whisk in ¼ cup of flour by hand. Let sit for 10 minutes. Whisk in another 2 cups of flour and mix thoroughly for ~5 minutes (I used my hands for this, which I coated lightly with olive oil to prevent sticking, but a wooden spoon would do the trick).

Add the raisins, olive oil, rosemary, cinnamon and salt to the dough and mix until well blended. Add the remaining 2 ¾ cups of flour and knead for ~6 minutes (the dough will be very sticky…I kneaded the dough while it was still in the bowl by sort of squishing it together with my hands, which were lightly oiled).

Rise the dough (first rise): Lightly oil the tub a bowl, scrape the dough in and lightly coat the surface of the dough with little oil. Cover with plastic wrap or lint-free cotton towel and let the dough rise until doubled in size, about 1-1 ½ hours. If you’re using a tub, be sure to mark the starting level of the dough with a pencil or piece of tape so it’s easy to tell when the dough has doubled.

Punch down and shape the dough: Scrape the risen dough onto a greased 17x12 inch baking sheet with ½ inch sides and press dwon onto the dough firmly to expel some air bubbles (but don’t knead the dough again). Push and stretch the dough into an even layer in the pan. If the dough begins to pull back and resist stretching, you can brush the top with a little olive oil, set the pan aside for 10 minutes and then try again.

Proof the dough: Brush the dough with a little olive oil and cover pan with plastc wrap. Let the dough rise until it is almost doubled in size. Or, if you want to bake the focaccia the following day, brush the dough with a little olive oil, let rise ~20 minutes, cover with plastic wrap and stick in the refrigerator overnight.

Prepare oven: Place baking or pizza stone in the oven and preheat the oven to 375 degrees F. Be sure to allow ~45 minutes for the stone to fully heat.

Bake the Focaccia: If you had the dough in the fridge overnight, take it out for ~30 minutes before proceeding. If not, continue on.

Remove plastic wrap, brush the dough olive oil if it was refrigerated (you can skip this additional oil if you didn’t refrigerate the dough overnight), dimple the dough by gently pressing your fingertips into the dough, about ½ inch deep, taking care not to deflate the dough by pressing too hard or making too many dimples.

Sprinkle the dough with Turbinado sugar and bake for 30-35 minutes (check that internal temp is at least 200 degrees F). Transfer to a cooling rack, brush lightly with olive oil immediately and cool for ~10 minutes before serving. Cut focaccia with a serrated knife.

Wednesday, July 1, 2009

Pumpkin Financier with Blueberry Compote


Pumpkin and Blueberries. These two flavors taste so delicious when combined, it’s crazy to me that they aren’t seen together more often. Perhaps it has something to do with sadly seasonal Pumpkin-cravings. It’s no secret that people tend to eat Pumpkin-heavy desserts during the Thanksgiving/Holiday season (helllllooo Pumpkin Pie), and then forget about them for the rest of the year. Poor Pumpkin…so often stuck in Libby’s cans, collecting dust until the next year’s Pumpkin Pie frenzy rolls around.

Well, let’s bring Pumpkin back for a summertime rendezvous. And, what better way to celebrate the Pumpkin rediscovery than with the delicious Blueberry? When plump and juicy Blueberries are cooked, their flavor profile changes immensely. They become deeper and more complex, able to stand up to bolder flavors and spices. In short, they become more compatible with our dear friend, Pumpkin.

So, here we go….I’ll bake up a Pumpkin Financier made with Almond flour and highlighted by browned butter, Orange zest and spices like Cinnamon, Nutmeg and Ginger.


Then, a Blueberry Compote simmered with a Cinnamon stick to top it all off.


When it’s all put together…with some softly whipped cream on top, it’s hard to remember how we ever made it through a summer without Pumpkin desserts…mmm.


Pumpkin Financier
(Pumpkin Financier recipe adapted from Sherry Yard)

5 oz butter
1 ¼ cups almond flour
1 ¼ cups AP flour
1 ½ cups powdered sugar
1 tsp baking powder
½ tsp baking soda
¼ tsp salt
½ tsp ground cinnamon
½ tsp ground ginger
¼ tsp ground nutmeg
2 Tbsp tightly packed brown sugar
8 egg whites, room temp
1 cup pumpkin puree
½ tsp chopped orange zest

Preheat oven to 350 degrees and brush a 10” round cake pan with butter, line with parchment, brush with butter again.
Melt butter in saucepan until it browns (7-10 minutes). Set aside to cool to room temp.
Sift together almond flour, AP flour, powdered sugar, baking powder, baking soda and salt into the bowl of a stand mixer with a paddle attachment. Add spices and brown sugar. Mix dry ingredients for 30 seconds. Add egg whites all at once and mix on medium speed for 3 minutes. Add pumpking puree and orange zest and mix for 30 seconds.
Add melted butter all at once. Mix for 30 seconds on medium speed, then turn mixer to high speed and mix for 3 minutes more.
Poor mixture into prepared pan and bake for 35-40 minutes, rotating pan, until toothpick inserted in the center comes out clean.


Blueberry Compote

1 pint Blueberries
Sugar to taste
Pinch of Salt
1 Cinnamon Stick

Put all ingredients in saucepan and cook over medium-low heat stirring occasionally until fruit becomes soft and mixture thickens (~7-10 minutes). Remove Cinnamon stick. Serve compote with Pumpkin Financier and a dollop of softly whipped cream.

Thursday, June 25, 2009

Gateau Paris-Brest: a Delicious Pastry with a Story


One of the (non-edible) things I love about food is how it can tell a story. Now, I’m not saying that the first thing that pops to mind as I’m staring at my dinner is ”Oh, my dear dinner, tell me a story…” BUT, when I’m full (and thus less impatient) I do enjoy learning stories behind the delicious bites that made my tummy happy.


One story-full pastry that I enjoy is the “Gateau Paris-Brest”. Apparently, this pastry is supposed to resemble a bike tire, in honor of a famous bike race from Paris to Brest, France. The Gateau Paris-Brest dessert starts off with a ring of the dough called “pate a choux”. Pate a choux is the same type of dough that is used for things like cream puffs, éclairs and profiteroles. The dough starts out on the stovetop and then (after being piped into the desired shapes) it is baked in the oven.


The way I was taught to make a traditional Gateau Paris-Brest, is to top the dough ring with sliced almonds before baking. After it has finished baking and is cool, it is cut horizontally and then filled with a layer of almond-praline pastry cream and then a layer of rum whipped cream. Rum whipped cream is amazing…it’s a sweet secret weapon all in itself.

Finally, this round and delicious pastry is lightly dusted with powdered sugar and gobbled up. The Gateau Paris-Brest is absolutely refined and delicious. It tastes lightly sweet and a little boozy with crunch from the almonds and a multi-dimensional creaminess that is irresistible.


Gateau Paris -Brest
(adapted from Mary Risley)

Choux Paste
1 cup water
4 oz butter
1 cup flour
4 eggs
pinch salt
2-3 Tbsp sliced almonds

Praline
1 cup sugar
1/2 cup almonds

Pastry Cream (lighter version)
4 egg yolks
1/2 cup sugar
1 tsp vanilla
2 Tbsp cornstarch
1 1/4 cups milk
pinch of salt

Rm Whipped Cream

2 cups heavy cream
2 Tbsp sugar
2 Tbsp dark rum
Confectioner's sugar


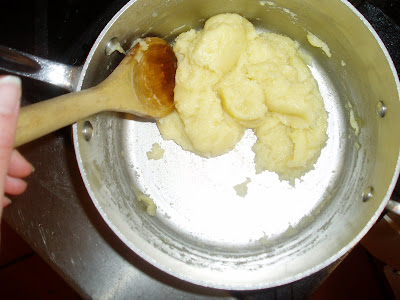
Choux: Preheat oven to 400 degrees. To make the pate a choux, combine the butter, salt and water in a small saucepan. Melt butter, then bring to a boil. Off the heat, add the flour all at once, beating with a wooden spoon until the mixture forms a ball and comes away from the sides of the pan. Return to the heat and cook 1-2 minutes, until the dough forms a shiny ball. Transfer dough to the bowl of Kitchenaid, fitted with a paddle. Mix at low speed until dough has cooled somewhat. Add eggs, one at a time, beating after each addition until incorporated. Place dough in pastry bad with round tip. On a parchment-lined sheet tray, pipe a ring. Pipe another ring inside the first ring. Pipe a third ring on top. Eggwash and sprinkle with almonds. Turn up oven to 425 degres and bake about 40 minutes, until very brown. Remove from oven and pierce bottom a few times to let steam escape. When cool, slice in half lengthwise, forming a top and bottom.

Pastry Cream: Combine the egg yolks and sugar in a bowl. Add the cornstarch. Temper mixture by gradually whisking in heated milk. Pour mixture into saucepan. Bring to a boil, whisking constantly. Cook 1-2 minutes, until thick. Add the vanilla. Cool covered with plastic or buttered waxed paper to prevent skin. When cool, mix with praline.

Rum Whipped Cream: When ready to assemble, whip the cream with sugar and rum until stiff. Pipe praline pastry cream into bottom of pastry. Pipe whipped cream on top of praline cream. Cover with top pastry and dust with confectioners sugar.

Thursday, June 18, 2009

Baking Bagels


It’s sort of an anomaly that I’m enamored with bagels. I grew up in the Midwest, which surely doesn’t explain it. And, although I’ve been carb-centric my whole life, I didn’t experience a REAL bagel until I was nearly twenty (thanks to my move to New York when I transferred colleges).

It was an edible epiphany…the reality of a B-A-G-E-L was so different from anything I’d experienced before. I realized that I’d been duped for all these years by rolls with holes, fictitiously labeled “bagels” in the grocery aisles I’d grown up in.

To me, the perfect bagel has a chewy, crunch of an exterior that your teeth pierce through, almost with a snap. A bagel has spring and depth to it, and I love mine topped with sesame seeds. There is something about the seeds’ slight texture and sweet undertone that complement the doughy orb perfectly.

Now that I live in San Francisco, I’ve been bagel frustrated for almost a year. The bagels that I’ve encountered in the Bay Area are imposters. I had almost decided to give up when (luckily) my bagel libido was revived. I realized that I could overcome this bagel dilemma…all I had to do was MAKE them.


The recipe I used called for a “poolish” which is a pre-ferment that needs to hang out for at least 12 hours before using. When it’s ready, you make the bagel dough, which you then form and rest (for another ~6-12 hours).


Then, it’s time for boiling in a molasses-baking soda bath (the key to a bagel’s chewy exterior) and baking.


My first bagel attempt was only a partial success…I’d let my dough rest for too long, and the result was a slightly over-darkened, craggy specimen (though still tasty).


But, I was determined to perfect the art of bagel making. And, on Sunday morning, I basked in bagel glory. The little golden bagels were plump (so plump that their holes were nearly squashed closed) and chewy and divine…topped with a little cream cheese, butter or homemade strawberry–rhubarb jam…mmmm. Any takers?


Bagels


Poolish:
1 c. bread flour
1/8 t. instant yeast
1 c. water (at the temp specified on your yeast package...mine was 120-130 degrees F)
Mix well, cover and leave at room temp 3-5 hours; refrigerate overnight

Final Dough:
1 c. Poolish (from above)
1/2 t. instant yeast
1/2 c. water (at the temp specified on our yeast package...mine was 120-130 degrees F)
16 oz. bread flour
1 T. vital wheat gluten (I found this at Whole Foods Market)
3 t. kosher salt
1 1/2 T. Malt Syrup (I also found this at Whole Foods Market)
Cornmeal (for dusting sheet pan)
Toppings, if desired (sesame seeds, poppy seads, onion, salt, etc.)

Add to Water for Poaching:
1 T. Molasses
1/2 t. baking soda

Allow poolish to come to room temp.
Stir yeast into the water just to dissolve.
Combine the poolish, flour, gluten, salt, syrup and water-yeast mixture in the bowl of electric mixer with the dough hook.
Mix 1 minute at low speed, 10-12 minutes medium speed. The dough should be slightly stiff, dense, smooth and dry. Add additional water if needed.
Cut dough into 10 equal pieces (3-4 oz each). Roll pieces into balls; cover: let rest 5 minutes.
Line a sheet pan with parchment and dust lightly with cornmeal.
Roll each ball into a 6 inch rope, loop it around your hand with the ends slightly overlapping in your palm. Roll the ends on the counter to seal.
Place the shaped pieces 2 inches apart on the prepared pan.
Enclose the pan in a plastic bag and let rise 1 1/2 hours until they have increased by about 25%. Refrigerate the dough at least 6 hours, or overnight.
Position the oven rack in the middle and preheat to 475. Have a sheet pan lined with parchment sprinkled with cornmeal near the stove. Bring a large pot of water to a boil and reduce heat until the water shimmers; add molasses and baking soda to the water.
Gently drop the dough into the water, cooking in batches. Flip them after 1 minute and poach on the other side for one minute.
Remove the bagels with slotted spoon to the prepared pan. Sprinkle seeds or toppings if desired.
Bake bagels 10-12 minutes until light brown, rotating the baking sheet as needed for even dough color. Let them cool 30 minutes before eating.

Thursday, June 11, 2009

Fruit Fulfilled


Peaches and Berries and Cherries, oh my! I feel happy and inspired while perusing through the ever-fantastic Ferry Plaza Farmer’s Market in San Francisco…the vendors’ baskets overflowing with ripe and ready fruits that are eternally satisfying just to look at, let alone eat.

For me, it’s impossible not to leap on such lush treasure…cheerfully anticipating my next bite into a perfect, juicy peach (while simultaneously regretting my decision to wear a white t-shirt).

The thing about many ridiculously delicious fruits like peaches, nectarines, berries, etc. is that they are at their peak for only a short time before they become a soggy mushy mess of unmet potential. But, have no fear…tis the season for fruit desserts!

I’ve been on a bit of a peach kick lately. Actually I’ve been on a peach kick my whole life. I even enjoy their fuzziness...something I have learned is an acquired taste. That said, you can imagine my enthusiasm yesterday when peaches, along with blueberries, were on my “To Bake” list.

I started my kitchen dance by making a Galette, which is basically an open-faced pie without the bother of a pie plate. It’s a lovely vehicle to show off sunny peaches and bright blueberries. And, it’s a super simple treat to make.


Another reason I love Galettes is that they make sense both as a dessert and as a special weekend breakfast (or mid-day snack) with a steaming cup of tea and the newspaper.


After filling the Galette up with fruit, I still had lots of peaches and blueberries in need of a home. Following my innate love for small things, I piled fruit into a couple of ramekins and topped them with pastry dough that I cut into little star shapes. They ended up looking quite cute…a perfect Fourth of July dessert.


After putting the patriotic pastries into the oven, I was still elbow deep in fruit (apparently 3 lbs of peaches and a pint of blueberries goes a long way). I added some toasted almond slices to the peach-blueberry filling for crunch and then filled a medium sized baking dish with the sweet mixture. I finished the ensemble by creating a quaint lattice top.


Into the oven my lattice topped fruit went, where it bubbled up and juiced out and turned golden brown.


Fruit desserts are divine with a nice big scoop of ice cream, which is not only delicious but also a safeguard for those of us who can’t wait to try a big bite, but don’t want a burnt tongue.

Blueberry and Peach Galette

1 2/3 cups AP Flour
1 tsp salt
1 tsp sugar
8 Tbsp cold unsalted butter, cut into 1/2 inch dice
1/2 cup ice cold water (may not need all of it)

1/2 cup sugar
2 Tbsp corn starch
3 lbs peaches, sliced 1/2 inch think (~6 cups)
1 pint blueberries
juice from 1/2 a lemon

To make the dough, place the flour, salt and sugar into the bowl of a food processor and blend for 10 seconds. Add the cold butter and pulse until butter is cut into medium pieces (~5 seconds). Add cold water slowly and pulse until dough comes together in small, thick clumps (you may need to adjust the amount of water you use). Empty dough onto work surface and bring into a ball. Place in wax paper and then in the fridge to chill for at least 20 minutes.

To make the filling, in a large bowl whisk the sugar with the cornstarch. Gently toss in the peaches and blueberries, and sprinkle with the lemon juice. Let sit for 5 minutes, tossing occasionally.

Roll out the dough on a lightly floured surface to about 12 inches around. Fold the dough in half then half again and place on a parchment lined baking sheet, unfold to make a round.

Pour the fruit and juices (scraping the bowl to make sure you get all the cornstarch) into the pastry and mound it, leaving a 6 inch opening of exposed fruit in the center of the crust. Brush water on the pastry and sprinkle with sugar. Bake on the lower rack of a preheated 375 degree oven for 35-45 minutes.

Saturday, June 6, 2009

Strawberry-Rose Roulade


Oh, the delicious Roulade. This fancy sounding dessert is basically a jellyroll wearing high heels, all dolled up for a night on the town.

For me, making Roulades is soothing. A good thing to embark on when you’re in need of some Zen…kind of like the yoga of the pastry world. There is a gentle nature in their preparation, and they come together fairly quickly.

Another thing I like about Roulades is that they are easy to play with in terms of flavor combinations and tastes. I’m a flavor flirt, so I love this versatility of Roulades.

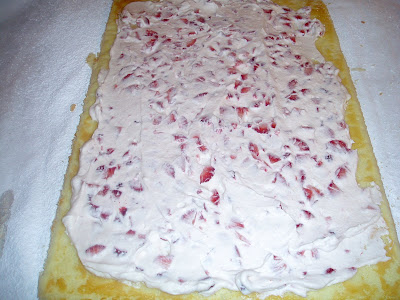
My first date with a Roulade was full of strawberries and rose…literally. I combined strawberries and rose extract with a cloud of lightly sweetened, softly whipped cream. Then, I layered the Strawberry-Rose Cream onto the Lemon-Scented Genoise Cake that I had baked earlier (in a sheet pan so it was flat).

The final step is to roll up the cake, which creates lovely swirls of cake and filling that are both beautiful and delicious looking. You can’t help but want to dive in for a luscious bite.

To accompany the Roulade, I made a fresh strawberry sauce and sugared rose petals for decoration.

Strawberry-Rose Roulade

6 large eggs

7 oz sugar

2 tsp vanilla extract

3 ½ oz sifted cake flour

¼ tsp salt

3 oz unsalted butter, melted and cooled

1 tsp lemon zest

1 pt strawberries

8 fl oz whipping cream

1 Tbsp sugar

¼ tsp rose extract

Confectioner’s sugar for dusting

Preheat oven to 350 degrees and line a half sheet pan with parchment.

Place eggs and sugar in bowl of stand mixer and set bowl over simmering water. Whisk constantly to keep eggs from scrambling. Heat mixture to about 110 degrees, or until eggs are warm and sugar is dissolved and no longer grainy to the touch.

Whip egg mixture on high speed until very light in color, thick and holds a ribbon (~10 minutes). Blend in vanilla and lemon zest.

Sift flour and salt together 2 times. With a strainer, sift 1/3 of the flour over the egg mixture and gently fold in with a whisk, spatula, bowl scraper, or your hand. Repeat 2 more times until all flour is used. There should be no streaks or lumps of flour. Whisk a generous scoop of batter into the melted butter, incorporating completely. Fold this butter mixture back into the batter. Immediately pour batter into prepared pan, using offset spatula to smooth into an even layer.

Bake cake ~ 15 minutes, until golden firm to touch and a toothpick inserted into center comes out clean.

Slice strawberries thinly (bite-size). Whip the cream, sugar and rose extract together. Fold in strawberries.

Dust top of the cooled cake with the confectioner’s sugar and place a piece of parchment on top. Flip cake out of pan onto a work surface, with a long side facing you. Carefully peal the parchment off the top. Spread filling evenly over the cake, leaving a 1” border all around. Starting with the long side closest to you, fold the edge over the filling, and then roll the cake into a log, pulling up and forward on the bottom parchment to help you roll the cake. When finished, the seam should be on the bottom. Trim ends. Lift roulade onto serving platter. Refrigerate at least 2 hours before slicing.

(From The Art and Soul of Baking by Cindy Mushet, adapted by crc).