Be.Baking has moved!

You should be automatically redirected in a few seconds. If not, visit
http://bebaking.com and update your bookmarks.

Showing posts with label Chocolate. Show all posts

Wednesday, December 9, 2009

Low Fat Chocolate Chip Cookies


‘Tis the season for holiday cookies! Sugar cookies, molasses cookies, spice cookies, nut cookies, big cookies, small cookies, rolled cookies drop cookies, cookie bars…sheesh…I’ve got a lot of baking to do! Speaking of which, I want to share one of my favorite cookie recipes with you…something to keep in your cookie arsenal for years to come: Chewy Gooey Low Fat Chocolate Chip Cookies.

Yes, you read correctly LOW FAT cookies. Now, before you run for the hills and start cursing my name, please give this recipe a chance. I promise you that it’s not just some cardboardy cookie with the single virtue of being better for you. The number one reason you will love these cookies is because they are fantastically delicious. The low fat bit just makes the package that much sweeter.


This ooh so gooey and chewy chocolate chip cookie recipe is a bit different than a traditional chocolate chip cookie recipe. First, it relies on browned butter (a technique where butter is melted on the stove until it turns light brown and starts smelling nutty). Browning the butter bumps up the buttery flavor meaning you can use less of it while maintaining the same intensity. Also, in order to keep these cookies moist and chewy, dates are used. The dates are chopped up, cooked down and strained so they become a puree (and are undetectable in the final cookie). The dates do not impart any fruit flavor in this cookie, thanks largely to the browned butter.
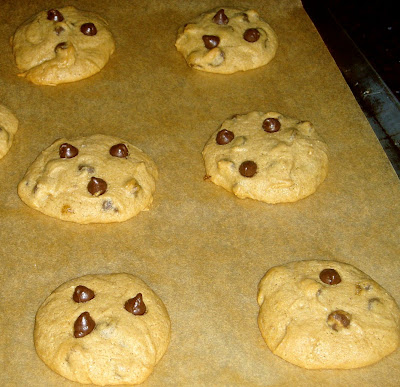

The rest of the ingredients are more standard…I like to use all dark brown sugar because I like it’s deep intensity. A good amount of vanilla and some salt round out the rest of the flavors and make these cookies out of this world. This is a chocolate chip cookie recipe to replace all others.

Chewy Gooey Low Fat Chocolate Chip Cookies
(adapted from Cook’s County)

1 cup water
4 tablespoons finely chopped dates (I like using Medjool dates)
3 tablespoons butter
2 cups all-purpose, unbleached flour
½ teaspoon baking soda
½ teaspoon salt
1 ¼ cups packed brown sugar (dark or light)
1 large egg
2 teaspoons vanilla extract
½ cup semisweet chocolate chips

Preheat oven to 325 degrees. Line 2 baking sheets with parchment paper.

Bring water to boil in small saucepan and add dates. Simmer until tender and most of the water has evaporated (~20 minutes). Using a rubber spatula, press dates through a fine-mesh strainer into a medium bowl (discard the bits that you can’t get through the strainer). You should have about ¼ cup of the date puree.

Cook butter in a saucepan over medium heat until nutty brown (~4 minutes). Let cool.

Whisk the flour, baking soda and salt in a medium bowl. Set aside.

Beat (with a stand mixer or by hand) the browned butter, brown sugar and date puree in a medium bowl until blended. Beat in the egg and vanilla until combined. Add flour mixture and mix until combined. Reserve 2 tablespoons chips and stir remaining chips into the batter by hand.

Roll 2 tablespoons of dough at a time into balls to get 18 cookies. Space the cookies about 2 inches apart on the cookie sheets. Press the remaining chocolate chips evenly over the cookies.

Bake until the edges are golden brown and center are soft and puffy, 15-18 minutes. Rotate the cookie sheets halfway through baking. Cool cookies completely on baking sheets.

Share

Sunday, November 1, 2009

Halloween Macarons and Mini Pizzas

Here's hoping your Halloween was happy and delicious!


Nick and I went to a Halloween potluck party hosted by a couple of our dear friends. We dressed as Betty Crocker and Chef Boyardee. I’ll let you figure out who was who…

For the party, I made Orange French Macarons filled with Grand Marnier Ganache. They were BooooOOoooozie…


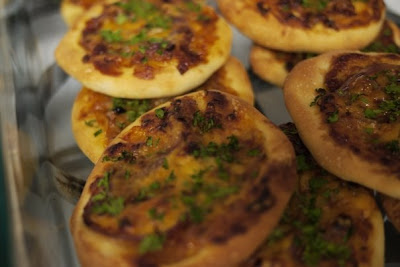
Nick also decided to bake for the party, and gave homemade pizza a try (using the pizza dough recipe from my last post). He made mini pizzas with a homemade pomegranate BBQ sauce, cheddar cheese and cilantro.


Those are some treats worth sinking your teeth into!

Thursday, October 15, 2009

Chocolate-Banana Marble Bread


I’m not very good at following recipes. I don’t start out trying to be a recipe rebel but once I get into the kitchen, I tend to stray from the written word.

Yes, yes, you’re right that baking is incredibly scientific and you have to be careful with your tinkering. But, if you know a bit of the “why” behind what you’re doing and have a slightly daring spirit, you should be able to twist a recipe and get something yummy. And if it tastes like an old man’s boot…well, we learn from our mistakes!


My most recent recipe interpretation was for Chocolate-Banana Marble Bread. I know the original recipe is a good one because I tried it (a good starting point). Plus, I had some over-ripe bananas in the freezer that I wanted to clear out. The freezer is a good trick if you have bananas that are super-ripe but don’t have time to bake. All you need to do is peel them, stick them in a sealed plastic baggie and put them in the freezer.


The first thing I did to the marble bread recipe was add a bit of salt. I add salt to all baking recipes if they don’t include it, just a pinch of it boosts the flavors of everything else - your final product won’t taste salty…just more delicious.

In the original recipe, there was more butter than there needed to be. I decided to brown the butter in a small saucepan over low heat to pump up the butter flavor while using less of it (a great trick I got from America’s Test Kitchen). Since I had removed some of the butter but wanted to ensure that the final product was still moist, I decided to use a bit more buttermilk than the recipe called for and substitute half of the total sugar with brown sugar. Another issue I had with the original recipe was that it didn’t call for any actual chocolate (just cocoa powder). I’m a chocolate fiend so the chocolate omission needed to be addressed, and what better way than with chocolate chips?!


Speaking of chocolate chips…I’ve had a hard time finding really delicious chocolate chips. It’s easy to see the word “chocolate” and sort of trick yourself into thinking they taste good, but lots of the brands out there don’t! I did a taste test at home and was disappointed by the majority of the brands on the shelves. My favorite brand of chocolate chips at the local Whole Foods Market are made by the company “Enjoy Life”. The chocolate chips are mini, which I actually prefer in most baked goods…the proportions end up juuuuust right.


Out of the oven, all warm and toasty. Chocolate! Bananas! Joy!

The recipe I came up with is below…please tweak it to your liking.

Chocolate-Banana Marble Bread
(Thanks to Cindy Mushet for the recipe upon which this one is based)

3 very ripe medium sized bananas, peeled and at room temp
½ cup buttermilk
¼ teaspoon salt
2 teaspoons vanilla extract
1 cup sifted pastry flour
1 cup sifted all purpose flour (you can use 2 sifted cups of all purpose flour if you don’t have pastry flour)
1 teaspoon baking soda
¾ teaspoon baking powder
¼ cup cocoa powder (Dutch-process or natural is fine…I used natural)
3 tablespoons boiling water
6 Tablespoons butter
½ cup sugar
½ cup brown sugar
2 large eggs, slightly beaten
¾ cup mini chocolate chips

Preheat the oven to 350 degrees.

Lightly coat a 9x5 loaf pan with melted butter or high-heat canola spray and line it with a piece of parchment that extends 1 inch beyond the long edges of both sides of the pan (this will make it easy to take the bread out of the pan).

Put butter in a small saucepan over low-moderate heat and swirl the pan as the butter melts and starts to brown…when the butter starts to smell slightly nutty and the color darkens to amber, take it off the heat and let it cool (if you burn the butter…and you’ll know if you do…start over or your marble bread will taste bitter).

Sift the flours, baking soda, baking powder and salt into a large bowl. Set aside. Put the coca powder in a small bowl and pour the boiling water over it until it forms a smooth paste. Set aside.

Put the bananas in the bowl of a food processor and process to a smooth puree (or just mash them with a fork). Transfer the puree to a large bowl and add the sugars, buttermilk, cooled browned butter, vanilla, and eggs and whisk until just blended.

Make a well in the center of the dry ingredient mixture and add the wet ingredients, gently mix until just blended...mix only until there aren’t any white pockets of flour.

Transfer half of the batter to a medium sized bowl, add the cocoa paste and gently but thoroughly blend it together.

Fold half of the chocolate chips into the light batter and half into the dark batter.

Drop alternating spoonfuls of the dark and light batters into the prepared pan, then “marbelize” it by using a spoon to gently turn the batter over in 3 places down the length of the pan (you’re essentially folding the two colors of batter into one another).

Bake for 55-65 minutes, until firm to the touch and a toothpick comes out clean. Transfer to a rack and cool completely. When cool, remove from pan, peel off parchment and cut slices using a serrated knife.

Friday, August 14, 2009

Chocolate with Alice Medrich


Oh, I wish it were last Wednesday, I wish it were last Wednesday....sigh, no luck. I suppose I shouldn't try to live in the past, but last Wednesday’s pastry class with Alice Medrich was so amazing, I can't bear to let it go. At least I can write about it, although it’s a shame there will be no tasty samples this time around.

So, “Who is Alice Medrich?” you ask. Or, if you already know who she is, then your mouth is surely watering. Alice Medrich is known in the culinary world as the “First Lady of Chocolate” (I wonder if the “First Lady of Muffins” is up for grabs…). This woman deserves her title. She introduced upscale, European chocolate desserts to America and was the founder/owner of the San Francisco based chocolate shop, Cocolat, for over 15 years. She has written numerous books, received multiple James Beard awards, and has seduced many hungry followers all over the world.

Oh, and the desserts she makes! She started the demo by making a “Celebration Cake” with layers of rum-soaked chocolate Genoise (a light, airy cake), a crunchy chocolate-hazelnut layer, chocolate mousse, mascarpone and raspberries in the final layer. The cake was enveloped in shiny, hard chocolate and was topped with chocolate fans (something she made effortlessly, but have since caused me much anxiety and chocolate dismay trying to replicate).


Alice introduced us to a relatively new technique; caramelizing white chocolate. She caramelized the white chocolate by placing it in a large metal bowl, and then putting it into a low oven (~250 degrees F), stirring every 10 minutes or so. She served the caramelized white chocolate as ice cream, scooped into the daintiest Coconut Tuile cones. On top were a few crystals of smoked sea salt (an idea she gave David Lebovitz credit for). The salt brought out deep caramel and nut flavors in the ice cream that weren't distinguishable without it. Alas, I have no pictures of this dessert…it was a mad rush to eat the ice cream before it turned into soup, I hope you understand.

Other treats of the night included Coconut Macaroons with grated lime zest and cinnamon in them...


Which she topped with a light chocolate mousse and bittersweet chocolate drizzle.


There was also a Sesame and Chocolate Torte glazed with dark, milk and white chocolate.


And of course there were lots of other chocolate goodies, including crusty French bread that was toasted, tossed in olive oil and then covered in dark chocolate. How divine.


And, as is right and good with all things dessert, there’s more! We had a chocolate tasting, which included a variety of chocolates made by different companies. When tasting, Alice recommended starting with darkest, most bitter chocolates (which had the highest percentage of cacao) and working towards the sweetest chocolates (which had the lowest cacao content). After this experience, I recommend using Valrhona, TCHO or Guittard chocolate for all baking and eating pleasures.

Sunday, May 17, 2009

A Dozen Soufflés Later

I should have known I was in for trouble when I walked into pastry class and there was a giant cowbell sitting on the counter.  Instead, I was too absorbed in thoughts of soufflés to even notice the bell.

I’ve eaten and enjoyed both sweet and savory soufflés many times, but was a bit wary to try my hand at creating one…soufflés fuel many a rumor mill.  There are dozens of soufflé horror stories out there, usually starring a fallen soufflé and resulting in some baker having a mild mental breakdown.  I did not want to have a mental breakdown, no matter how mild.

Before letting us loose in the kitchen, Christa proclaimed that “A soufflé waits for no man,” which brings me back to the reason for the cowbell.  It was there to alert all of us when a soufflé came out of the oven, because we needed to taste it immediately. (Normally, we do one mass tasting at the end of the class).  After Christa’s exclamation, we were off and I started making a chocolate soufflé with a fresh berry sauce.

Just as I was getting into the soufflé groove, I head the cowbell's cry “BING-BING-BING,” the first soufflé was out of the oven and ready to taste. 

And, it was delicious..so I took one bite and then two.  Then, I went back to work on my soufflé until a few minutes later “BING-BING-BING,” the next soufflé was ready for tasting.  Armed with a spoon in my pocket, I swooped in for a big gloppy spoonful of this Grand Marnier spiked souffle and sighed happily. I liked soufflés. 


Or at least I liked soufflés until I had “tried” the sixth or seventh of the evening.  At that point, I still had another seven soufflés left to taste and already despised the cowbell which had started to evoke a “run away from the soufflé” fear response.  I obviously had not paced myself well.

I must admit that I was a big sissy and hid in the back of the kitchen to avoid a couple of the last soufflé tastings…my teeth were starting to fall out (or at least that was my mental image).  In the end, I’m glad I was a soufflé ninny because I think I was one or two soufflés away from shunning the dessert for life.  Instead, I have recovered and accepted soufflés back into my life.  They are appealing (when eaten in moderation).  The are light and fluffy and saucy all at once…and they look quite impressive, too.  Cowbells on the other hand, I will hate forever.

Here's the chocolate souffle recipe pictured above (recipe courtesy of Tante Marie Cooking School):

Souffle au Chocolate

7 oz. semisweet chocolate

5 Tbsp water

1/3 cup flour

2 cups cold milk

1/2 tsp vanilla

4 egg yolks, blended with a fork

6 egg whites

Pinch of salt

Pinch of cream of tartar

1/2 cup sugar

Confectioner's sugar for dusting

Prepare a 2 quart souffle dish by brushing the inside with butter and coating it with sugar.  Clean the rim.  Preheat oven to 400-degrees.  Center an oven rack.

In a bain marie (water bath), melt the chocolate with the water.  When melted, stir until smooth and keep warm.

In a medium saucepan, off the heat, make a paste by whisking the flour and a small amount of milk, then add the remaining milk.  Add the vanilla and bring to a boil, stirring vigorously until thick.  Cook for 1 more minute, then blend in chocolate and remove from heat.  Temper the egg yolks, then add to the chocolate mixture.

Beat the egg whites with a pinch of cream of tartar until soft peak.  Slowly add sugar and beat until stiff peak.  Warm the chocolate base if necessary and stir in 1/3 of the egg whites to lighten, then fold in the remaining egg whites.

Spoon the souffle into prepared dish.  Use your thumb to clean the rim and "cut" into the souffle.  At this point, you may cover with an inverted bowl and leave at room temp for an hour before baking.  Bake in center of oven, turning it down to 375-degrees.  Should take about 30 minutes. Sprinkle with confectioner's sugar and serve immediately.