Be.Baking has moved!

You should be automatically redirected in a few seconds. If not, visit
http://bebaking.com and update your bookmarks.

Monday, December 28, 2009

Poppy Seed Roll

Poppy Seed Rolls remind me of my Mom, who I'm missing a lot after a nice holiday visit. Since she's on my mind, I decided to bring the glory of the Poppy Seed Roll to this sweet little blog space.


My Mom’s stories of the delicious Poppy Seed Rolls she ate as a child are missing just one thing: my Grandmother’s recipe. This is obviously a situation that needs to be rectified…

And so, I took it upon myself to create the Poppy Seed Roll of my Mom’s childhood; a softly sweet, bready roll spiraled with lots of poppy seed filling.

You can opt to make or buy poppy seed filling (I’ve had luck with the poppy seed filling made by a company called Solo). However, your most delicious bet is to make the filling yourself, and its actually quite easy. Simply simmer poppy seeds down with some milk, sugar, honey, orange zest, a pinch of salt and a hint of vanilla (raisins are NOT permitted…Mother’s rules). When it tastes delicious, your filling is done.


I recommend wrapping the poppy seed filling up in a light and buttery dough. I like using the same dough I use for Cinnamon Buns, you can find the recipe here: http://bit.ly/7Pd7sj . Next, I roll out the dough, load it up with poppy seed filling, roll it up and then bake it until golden. I like to then paint it with a bit of warmed apricot jam and drizzle on some simple vanilla glaze made of confectioner’s sugar and vanilla extract.


Yum…a soft and light bread full of deliciously sticky poppy seed filling…which is slighty nutty and has a teeny little crunch. The gentle tang from the apricot jam is perfect. If you’ve never tasted a Poppy Seed Roll before, I urge you to try this out...and don’t forget to share the recipe!

Share

Friday, December 18, 2009

A Holiday Cookie Recipe and How to Ship Baked Goods

Egads! The dilemma of the holiday season is upon us: what the heck to get everyone on your list. Well I have an answer for you…and it’s sweet and lovely and involves butter. Simply bake up some delicious goodies, package them ever so cutely, and…presto gifto!


To start you off right in your holiday bake-a-thon, I have a perfect holiday butter cookie recipe to share. This butter cookie is sturdy enough to hold up to extensive decorating and won’t turn to dust if jostled around a bit. It’s also so delicious that you’ll have a hard time giving these cookies away. Of course, if you “accidentally” break a few cookies…well then you’ll just HAVE to eat them yourself.

These cookies are also incredibly versatile. You can cut them out and decorate them with colored sugars, sprinkles and frostings. Or, you can turn them into thumbprint cookies with jam in the middle. Or perhaps you’d like to make them into sandwich cookies? Oh yes, you get to unleash your creative side with these babies.


After you’ve baked your storm of cookies, you can package them in a nice tin and hand them off to a friend that lives nearby. Or, for those people that don’t live so nearby, you can ship these cookies (another reason I love this recipe).

When shipping cookies, you should either wrap each individual cookie in plastic wrap or stack a few together before wrapping (sometimes I like putting the cookies into clear plastic bags instead and tying it with ribbon for a nice presentation). The cookies will need to be packaged together tightly. I like using tissue paper between each cookie/stack of cookies to insulate them.

It’s quite important to include two lines of defense when mailing cookies. You should not only have the box with the cookies inside of it, but also another shipping box. You will also need to pad the internal cookie box from the external one. I like using wadded up paper bags, but I’ve heard of people successfully using air-popped popcorn, bubble wrap or paper shreds as well.

Here’s to holiday gifts full of deliciousness!


Butter Cookies
Adapted from Cook’s Illustrated

2 ½ cups unbleached all-purpose flour
¾ cup sugar
¼ teaspoon salt
2 sticks unsalted butter, cut into 16 pieces and at cool room temperature
2 teaspoons vanilla extract
2 tablespoons cream cheese, cool room temperature

In a stand mixer fitted with the paddle attachment, mix the flour, sugar and salt on low speed until combined. With the mixer running, add the butter one piece at a time; continuing to mix until mixture looks crumbly and slightly wet, about 1 minute longer. Add vanilla and cream cheese and mix on low until dough just begins to form large clumps, about 30 seconds.

Remove dough from mixer and knead by hand in the bowl for 2 or 3 turns to form a cohesive mass. Turn out dough onto counter and divide in half, pat into two 4-inch disks and refrigerate for 20 -30 minutes.

Heat oven to 375 degrees. Roll out dough between parchment paper to 1/8 inch thick, chill for 10 minutes. Cut into desired shapes and place the cookies 1 ½ inches apart on parchment lined cookie sheets. Chill again for about 10 minutes. Bake until light brown, about 10 minutes. Decorate as desired.

Share

Wednesday, December 9, 2009

Low Fat Chocolate Chip Cookies


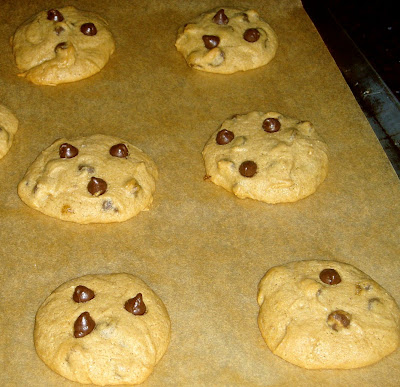
‘Tis the season for holiday cookies! Sugar cookies, molasses cookies, spice cookies, nut cookies, big cookies, small cookies, rolled cookies drop cookies, cookie bars…sheesh…I’ve got a lot of baking to do! Speaking of which, I want to share one of my favorite cookie recipes with you…something to keep in your cookie arsenal for years to come: Chewy Gooey Low Fat Chocolate Chip Cookies.

Yes, you read correctly LOW FAT cookies. Now, before you run for the hills and start cursing my name, please give this recipe a chance. I promise you that it’s not just some cardboardy cookie with the single virtue of being better for you. The number one reason you will love these cookies is because they are fantastically delicious. The low fat bit just makes the package that much sweeter.


This ooh so gooey and chewy chocolate chip cookie recipe is a bit different than a traditional chocolate chip cookie recipe. First, it relies on browned butter (a technique where butter is melted on the stove until it turns light brown and starts smelling nutty). Browning the butter bumps up the buttery flavor meaning you can use less of it while maintaining the same intensity. Also, in order to keep these cookies moist and chewy, dates are used. The dates are chopped up, cooked down and strained so they become a puree (and are undetectable in the final cookie). The dates do not impart any fruit flavor in this cookie, thanks largely to the browned butter.


The rest of the ingredients are more standard…I like to use all dark brown sugar because I like it’s deep intensity. A good amount of vanilla and some salt round out the rest of the flavors and make these cookies out of this world. This is a chocolate chip cookie recipe to replace all others.

Chewy Gooey Low Fat Chocolate Chip Cookies
(adapted from Cook’s County)

1 cup water
4 tablespoons finely chopped dates (I like using Medjool dates)
3 tablespoons butter
2 cups all-purpose, unbleached flour
½ teaspoon baking soda
½ teaspoon salt
1 ¼ cups packed brown sugar (dark or light)
1 large egg
2 teaspoons vanilla extract
½ cup semisweet chocolate chips

Preheat oven to 325 degrees. Line 2 baking sheets with parchment paper.

Bring water to boil in small saucepan and add dates. Simmer until tender and most of the water has evaporated (~20 minutes). Using a rubber spatula, press dates through a fine-mesh strainer into a medium bowl (discard the bits that you can’t get through the strainer). You should have about ¼ cup of the date puree.

Cook butter in a saucepan over medium heat until nutty brown (~4 minutes). Let cool.

Whisk the flour, baking soda and salt in a medium bowl. Set aside.

Beat (with a stand mixer or by hand) the browned butter, brown sugar and date puree in a medium bowl until blended. Beat in the egg and vanilla until combined. Add flour mixture and mix until combined. Reserve 2 tablespoons chips and stir remaining chips into the batter by hand.

Roll 2 tablespoons of dough at a time into balls to get 18 cookies. Space the cookies about 2 inches apart on the cookie sheets. Press the remaining chocolate chips evenly over the cookies.

Bake until the edges are golden brown and center are soft and puffy, 15-18 minutes. Rotate the cookie sheets halfway through baking. Cool cookies completely on baking sheets.

Share

Tuesday, December 1, 2009

French Apple Tart

It took me months to decide on a dessert to make for the Thanksgiving table. Yes, months.

Given my tendency to overdo it when it comes to desserts... **flashback to when I brought 6 different desserts to a mid-day gathering of about 8 people** ...I decided to focus on making just one lovely dessert. A novel idea, I know.


There is something nice about having only one dessert to focus on. I appreciate it more that way and there is no internal battle as to which dessert I want to be my last bite (this is a very important decision if you are me). As long as there is more than enough dessert to go around, having only one dessert available can be liberating.

For Thanksgiving, I wanted to make a fun dessert that was slightly intricate and accessibly fancy. It needed to make sense with the rest of the meal, and leave people pleasantly full, not overly stuffed. And thus began my Thanksgiving dessert debate.


First, I “decided” to make a fluffy Lemon Cake with Meringue Frosting…but no, it was a bit too intense and flashy. Then, I thought about doing a Cardamom Pound Cake with Poached Oranges…but, eh…I wanted something lighter. Maybe a Pear Cranberry and Walnut Pie? No. And on and on it went…

Right about the point when I was even annoying myself with the dessert flip-flopping, I figured it out; a classic and beautiful French Apple Tart. The recipe is from America’s Test Kitchen, so I knew it would be good.

It wasn’t just good, it was scrumptious. The crust was snappy and flaky, the apples were tart and sweetly caramelized. It was exactly what everyone wanted.


You can find the recipe here: http://www.americastestkitchen.com/recipe.asp?recipeids=4530&iSeason=8

Share