Be.Baking has moved!

You should be automatically redirected in a few seconds. If not, visit
http://bebaking.com and update your bookmarks.

Monday, October 26, 2009

Homemade Pizza

When I was growing up, my Mom made pizza fairly often. I picture her standing in the kitchen with smudges of flour all over her shirt, buzzing her Cuisinart to make pizza dough. I liked helping top the pizzas, almost always opting for mushrooms, onions and red pepper. Oh, and some fresh basil if we had it. Then, Mom would slide the doughy beauties into the oven.


The baking pizza smelled yeasty, sweet and herby with a cheesy tang. If I could have eaten the air coming out of the kitchen, I would have.

Just thinking about my Mom’s homemade pizza makes me want to hop on a plane to Illinois. Since I can’t do that every time I need a homemade pizza fix, I've learned to make it myself.

Pizza is relaxed and comfy…put whatever you’re craving on top of it, and enjoy it with people you love.


Pizza Dough

¼ cup warm water (110-115 degrees)
2 ¼ teaspoons active dry yeast, or 1 ¾ teaspoons instant yeast
1 cup water
3 tablespoons olive oil
3 ¼ bread flour (or All Purpose)
1 ½ teaspoons salt
Semolina or finely ground cornmeal

Pour the warm water into the bowl of a stand mixer. Add the yeast, whisk by hand to blend, and allow the mixture to sit for 5-10 minutes, until the yeast is activated and looks creamy. Add the 1 cup water and 3 tablespoons olive oil and whisk by hand. Add the flour and salt. Knead the dough on low speed for 2 minutes. Cover the bowl with plastic wrap and let the dough rest for 20 minutes. Turn the mixer to medium-low and continue to knead until the dough is firm, elastic and smooth (3-6 minutes).

Lightly oil a tub or bowl and scrape the dough in. Brush a little oil over the surface of the dough and then cover tightly with plastic wrap and let the dough rise at room temp until doubled in size, about 45-60 minutes.

Place a baking or pizza stone (if you have one) in the oven. Preheat the oven to 500 degrees. Give the oven at least 30 minutes to an hour to fully heat the stone, so you get a beautiful crispy crust.

Punch the dough down very gently to expel some of the bubbles. Then, turn the dough onto a lightly floured counter. Dust the top of the dough lightly with flour, then press down with your fingers to flatten the dough into a disk about 12 inches in diameter (you can use a rolling pin if you like).

Top the pizza with whatever deliciousness you have in mind. Center your pizza on a baking sheet that has been dusted with Semolina. You can bake your pizza on the sheet, or slide it directly onto the pizza stone.

Bake for 7-9 minutes until the dough is golden at the edges and bottom (use a spatula to slide under the pizza to check the bottom).

Tuesday, October 20, 2009

Sweet Bookery: "The Sweet Life in Paris" by David Lebovitz


Good friends, good food and good books…all together in one place. You can’t get much better than a pastry-inspired book club. Sweet Bookery includes some of the kindest, funniest and smartest people I know; my former pastry school classmates.

The first book we read was The Sweet Life in Paris by pastry chef and author, David Lebovitz. It’s a funny and endearing story about his move from San Francisco to Paris, and his experiences living as an American in Paris (with a heavy emphasis on the food). The book is full of hilarious anecdotes, words of advice and helpful tidbits. Not to mention some awesome recipes (both sweet and savory).

Since the book is full of fantastic recipes, it seemed logical to whip up a few for the meeting. I made his French Chocolate Macarons, which were less finicky than many other Macaron recipes. They had that wonderful crispy-chewy texture that is characteristic of a Macaron, and were lusciously chocolaty.


I also made some American Macaroons, which seemed appropriate given the context of the book. I used a David Lebovitz recipe for this as well (although it was from his website instead: http://bit.ly/25RXWh).


A fantastic Fig-Olive Tapenade recipe was both savory and sweet with a bit of crunch from the fig seeds that was unexpected and pleasant. I served it with Rosemary bread from the bakery where I work.


The recipe in the book for Spiced Nut Mix is out of this world good, and is a perfect sort of snack. It’s a tad spicy, slightly sweet, salty and crunchy. It’s also a lovely topping for ice cream.


A few of the other book club members brought some desserts from the book (drat! I didn’t get a chance to get any pictures of those tasty morsels).

Now, we are trying to decide what book to read next. It’s got a lot to live up to…

Thursday, October 15, 2009

Chocolate-Banana Marble Bread


I’m not very good at following recipes. I don’t start out trying to be a recipe rebel but once I get into the kitchen, I tend to stray from the written word.

Yes, yes, you’re right that baking is incredibly scientific and you have to be careful with your tinkering. But, if you know a bit of the “why” behind what you’re doing and have a slightly daring spirit, you should be able to twist a recipe and get something yummy. And if it tastes like an old man’s boot…well, we learn from our mistakes!


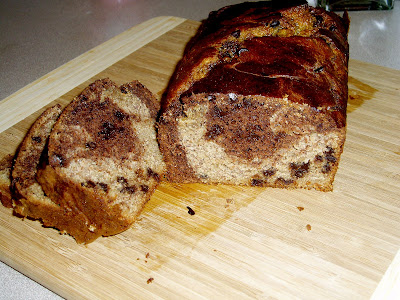
My most recent recipe interpretation was for Chocolate-Banana Marble Bread. I know the original recipe is a good one because I tried it (a good starting point). Plus, I had some over-ripe bananas in the freezer that I wanted to clear out. The freezer is a good trick if you have bananas that are super-ripe but don’t have time to bake. All you need to do is peel them, stick them in a sealed plastic baggie and put them in the freezer.


The first thing I did to the marble bread recipe was add a bit of salt. I add salt to all baking recipes if they don’t include it, just a pinch of it boosts the flavors of everything else - your final product won’t taste salty…just more delicious.

In the original recipe, there was more butter than there needed to be. I decided to brown the butter in a small saucepan over low heat to pump up the butter flavor while using less of it (a great trick I got from America’s Test Kitchen). Since I had removed some of the butter but wanted to ensure that the final product was still moist, I decided to use a bit more buttermilk than the recipe called for and substitute half of the total sugar with brown sugar. Another issue I had with the original recipe was that it didn’t call for any actual chocolate (just cocoa powder). I’m a chocolate fiend so the chocolate omission needed to be addressed, and what better way than with chocolate chips?!


Speaking of chocolate chips…I’ve had a hard time finding really delicious chocolate chips. It’s easy to see the word “chocolate” and sort of trick yourself into thinking they taste good, but lots of the brands out there don’t! I did a taste test at home and was disappointed by the majority of the brands on the shelves. My favorite brand of chocolate chips at the local Whole Foods Market are made by the company “Enjoy Life”. The chocolate chips are mini, which I actually prefer in most baked goods…the proportions end up juuuuust right.


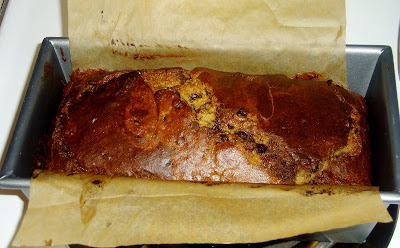
Out of the oven, all warm and toasty. Chocolate! Bananas! Joy!

The recipe I came up with is below…please tweak it to your liking.

Chocolate-Banana Marble Bread
(Thanks to Cindy Mushet for the recipe upon which this one is based)

3 very ripe medium sized bananas, peeled and at room temp
½ cup buttermilk
¼ teaspoon salt
2 teaspoons vanilla extract
1 cup sifted pastry flour
1 cup sifted all purpose flour (you can use 2 sifted cups of all purpose flour if you don’t have pastry flour)
1 teaspoon baking soda
¾ teaspoon baking powder
¼ cup cocoa powder (Dutch-process or natural is fine…I used natural)
3 tablespoons boiling water
6 Tablespoons butter
½ cup sugar
½ cup brown sugar
2 large eggs, slightly beaten
¾ cup mini chocolate chips

Preheat the oven to 350 degrees.

Lightly coat a 9x5 loaf pan with melted butter or high-heat canola spray and line it with a piece of parchment that extends 1 inch beyond the long edges of both sides of the pan (this will make it easy to take the bread out of the pan).

Put butter in a small saucepan over low-moderate heat and swirl the pan as the butter melts and starts to brown…when the butter starts to smell slightly nutty and the color darkens to amber, take it off the heat and let it cool (if you burn the butter…and you’ll know if you do…start over or your marble bread will taste bitter).

Sift the flours, baking soda, baking powder and salt into a large bowl. Set aside. Put the coca powder in a small bowl and pour the boiling water over it until it forms a smooth paste. Set aside.

Put the bananas in the bowl of a food processor and process to a smooth puree (or just mash them with a fork). Transfer the puree to a large bowl and add the sugars, buttermilk, cooled browned butter, vanilla, and eggs and whisk until just blended.

Make a well in the center of the dry ingredient mixture and add the wet ingredients, gently mix until just blended...mix only until there aren’t any white pockets of flour.

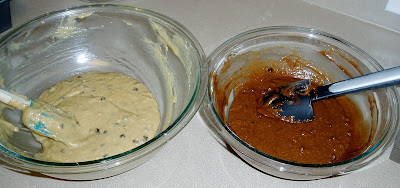
Transfer half of the batter to a medium sized bowl, add the cocoa paste and gently but thoroughly blend it together.

Fold half of the chocolate chips into the light batter and half into the dark batter.

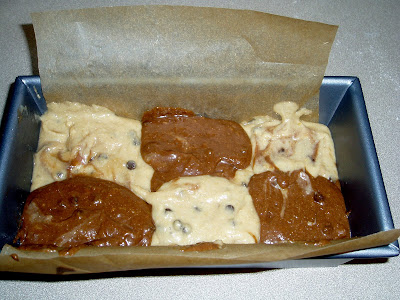
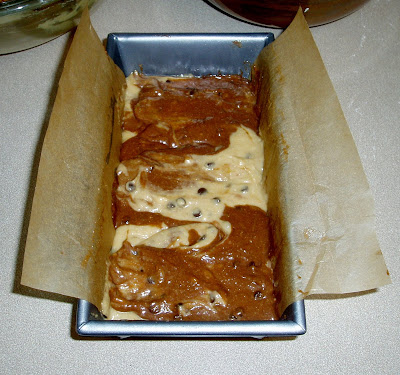
Drop alternating spoonfuls of the dark and light batters into the prepared pan, then “marbelize” it by using a spoon to gently turn the batter over in 3 places down the length of the pan (you’re essentially folding the two colors of batter into one another).

Bake for 55-65 minutes, until firm to the touch and a toothpick comes out clean. Transfer to a rack and cool completely. When cool, remove from pan, peel off parchment and cut slices using a serrated knife.

Sunday, October 4, 2009

Orange Pecan Cinnamon Swirl


I had some time on my hands, was feeling generous and know how Nick loves cinnamon buns. And so, I decided to bake up a delicious breakfast bread for him to bring to work…a riff on the sweet cinnamon buns he adores.

I started by making my favorite breakfast dough recipe. This dough is easy to put together and an absolute dream to work with. The only thing to watch out for with this dough is to make sure that the butter is room temp before incorporating it into the dough. If it’s not, it won’t incorporate smoothly and will take a bit more work.


Once the dough was smooth and silky, I rolled it out and filled it with orange zest, cinnamon, brown sugar, and toasted pecans (toasting nuts brings out a much stronger, richer flavor). I then rolled up the dough like I was making cinnamon buns, but then switched gears a bit. I wrapped it into a circle and cut slits 2 inches apart. Then I turned up these wedges so the filling was visible.

While it was baking, the whole apartment smelled of sweet cinnamon and I got an overwhelming feeling of comfort and “home”.

And then, out of the oven it came, and after some contemplation, I christened it “Orange Pecan Cinnamon Swirl”. I let it cool briefly and then drizzled an orange glaze over the top.


Lucky for me there was still one piece left when Nick came home that evening. It’s funny how people often feel bad taking the last piece of anything. If there’s a piece of something delicious left and I want to eat it…well, I see that as fate.

Turns out, the Orange Pecan Swirl was just as yummy for dessert as for breakfast.

For this recipe, go to the end of my post on August 28th and add the zest of 1 orange and 1 cup of toasted pecans to the filling, and substitute orange juice for the water in the glaze.