Thursday, June 25, 2009
Gateau Paris-Brest: a Delicious Pastry with a Story
One of the (non-edible) things I love about food is how it can tell a story. Now, I’m not saying that the first thing that pops to mind as I’m staring at my dinner is ”Oh, my dear dinner, tell me a story…” BUT, when I’m full (and thus less impatient) I do enjoy learning stories behind the delicious bites that made my tummy happy.
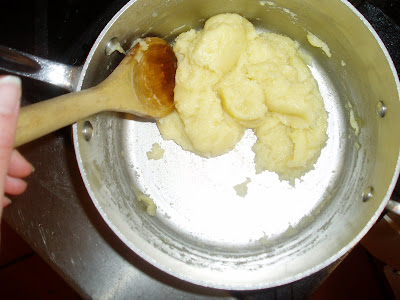
One story-full pastry that I enjoy is the “Gateau Paris-Brest”. Apparently, this pastry is supposed to resemble a bike tire, in honor of a famous bike race from Paris to Brest, France. The Gateau Paris-Brest dessert starts off with a ring of the dough called “pate a choux”. Pate a choux is the same type of dough that is used for things like cream puffs, éclairs and profiteroles. The dough starts out on the stovetop and then (after being piped into the desired shapes) it is baked in the oven.
The way I was taught to make a traditional Gateau Paris-Brest, is to top the dough ring with sliced almonds before baking. After it has finished baking and is cool, it is cut horizontally and then filled with a layer of almond-praline pastry cream and then a layer of rum whipped cream. Rum whipped cream is amazing…it’s a sweet secret weapon all in itself.
Finally, this round and delicious pastry is lightly dusted with powdered sugar and gobbled up. The Gateau Paris-Brest is absolutely refined and delicious. It tastes lightly sweet and a little boozy with crunch from the almonds and a multi-dimensional creaminess that is irresistible.
Gateau Paris -Brest
(adapted from Mary Risley)
Choux Paste
1 cup water
4 oz butter
1 cup flour
4 eggs
pinch salt
2-3 Tbsp sliced almonds
Praline
1 cup sugar
1/2 cup almonds
Pastry Cream (lighter version)
4 egg yolks
1/2 cup sugar
1 tsp vanilla
2 Tbsp cornstarch
1 1/4 cups milk
pinch of salt
Rm Whipped Cream
2 cups heavy cream
2 Tbsp sugar
2 Tbsp dark rum
Confectioner's sugar
Choux: Preheat oven to 400 degrees. To make the pate a choux, combine the butter, salt and water in a small saucepan. Melt butter, then bring to a boil. Off the heat, add the flour all at once, beating with a wooden spoon until the mixture forms a ball and comes away from the sides of the pan. Return to the heat and cook 1-2 minutes, until the dough forms a shiny ball. Transfer dough to the bowl of Kitchenaid, fitted with a paddle. Mix at low speed until dough has cooled somewhat. Add eggs, one at a time, beating after each addition until incorporated. Place dough in pastry bad with round tip. On a parchment-lined sheet tray, pipe a ring. Pipe another ring inside the first ring. Pipe a third ring on top. Eggwash and sprinkle with almonds. Turn up oven to 425 degres and bake about 40 minutes, until very brown. Remove from oven and pierce bottom a few times to let steam escape. When cool, slice in half lengthwise, forming a top and bottom.
Pastry Cream: Combine the egg yolks and sugar in a bowl. Add the cornstarch. Temper mixture by gradually whisking in heated milk. Pour mixture into saucepan. Bring to a boil, whisking constantly. Cook 1-2 minutes, until thick. Add the vanilla. Cool covered with plastic or buttered waxed paper to prevent skin. When cool, mix with praline.
Rum Whipped Cream: When ready to assemble, whip the cream with sugar and rum until stiff. Pipe praline pastry cream into bottom of pastry. Pipe whipped cream on top of praline cream. Cover with top pastry and dust with confectioners sugar.
Thursday, June 18, 2009
Baking Bagels
It’s sort of an anomaly that I’m enamored with bagels. I grew up in the Midwest, which surely doesn’t explain it. And, although I’ve been carb-centric my whole life, I didn’t experience a REAL bagel until I was nearly twenty (thanks to my move to New York when I transferred colleges).
It was an edible epiphany…the reality of a B-A-G-E-L was so different from anything I’d experienced before. I realized that I’d been duped for all these years by rolls with holes, fictitiously labeled “bagels” in the grocery aisles I’d grown up in.
To me, the perfect bagel has a chewy, crunch of an exterior that your teeth pierce through, almost with a snap. A bagel has spring and depth to it, and I love mine topped with sesame seeds. There is something about the seeds’ slight texture and sweet undertone that complement the doughy orb perfectly.
Now that I live in San Francisco, I’ve been bagel frustrated for almost a year. The bagels that I’ve encountered in the Bay Area are imposters. I had almost decided to give up when (luckily) my bagel libido was revived. I realized that I could overcome this bagel dilemma…all I had to do was MAKE them.
The recipe I used called for a “poolish” which is a pre-ferment that needs to hang out for at least 12 hours before using. When it’s ready, you make the bagel dough, which you then form and rest (for another ~6-12 hours).
Then, it’s time for boiling in a molasses-baking soda bath (the key to a bagel’s chewy exterior) and baking.
My first bagel attempt was only a partial success…I’d let my dough rest for too long, and the result was a slightly over-darkened, craggy specimen (though still tasty).
But, I was determined to perfect the art of bagel making. And, on Sunday morning, I basked in bagel glory. The little golden bagels were plump (so plump that their holes were nearly squashed closed) and chewy and divine…topped with a little cream cheese, butter or homemade strawberry–rhubarb jam…mmmm. Any takers?
Bagels
Poolish:
1 c. bread flour
1/8 t. instant yeast
1 c. water (at the temp specified on your yeast package...mine was 120-130 degrees F)
Mix well, cover and leave at room temp 3-5 hours; refrigerate overnight
Final Dough:
1 c. Poolish (from above)
1/2 t. instant yeast
1/2 c. water (at the temp specified on our yeast package...mine was 120-130 degrees F)
16 oz. bread flour
1 T. vital wheat gluten (I found this at Whole Foods Market)
3 t. kosher salt
1 1/2 T. Malt Syrup (I also found this at Whole Foods Market)
Cornmeal (for dusting sheet pan)
Toppings, if desired (sesame seeds, poppy seads, onion, salt, etc.)
Add to Water for Poaching:
1 T. Molasses
1/2 t. baking soda
Allow poolish to come to room temp.
Stir yeast into the water just to dissolve.
Combine the poolish, flour, gluten, salt, syrup and water-yeast mixture in the bowl of electric mixer with the dough hook.
Mix 1 minute at low speed, 10-12 minutes medium speed. The dough should be slightly stiff, dense, smooth and dry. Add additional water if needed.
Cut dough into 10 equal pieces (3-4 oz each). Roll pieces into balls; cover: let rest 5 minutes.
Line a sheet pan with parchment and dust lightly with cornmeal.
Roll each ball into a 6 inch rope, loop it around your hand with the ends slightly overlapping in your palm. Roll the ends on the counter to seal.
Place the shaped pieces 2 inches apart on the prepared pan.
Enclose the pan in a plastic bag and let rise 1 1/2 hours until they have increased by about 25%. Refrigerate the dough at least 6 hours, or overnight.
Position the oven rack in the middle and preheat to 475. Have a sheet pan lined with parchment sprinkled with cornmeal near the stove. Bring a large pot of water to a boil and reduce heat until the water shimmers; add molasses and baking soda to the water.
Gently drop the dough into the water, cooking in batches. Flip them after 1 minute and poach on the other side for one minute.
Remove the bagels with slotted spoon to the prepared pan. Sprinkle seeds or toppings if desired.
Bake bagels 10-12 minutes until light brown, rotating the baking sheet as needed for even dough color. Let them cool 30 minutes before eating.
Thursday, June 11, 2009
Fruit Fulfilled
Peaches and Berries and Cherries, oh my! I feel happy and inspired while perusing through the ever-fantastic Ferry Plaza Farmer’s Market in San Francisco…the vendors’ baskets overflowing with ripe and ready fruits that are eternally satisfying just to look at, let alone eat.
For me, it’s impossible not to leap on such lush treasure…cheerfully anticipating my next bite into a perfect, juicy peach (while simultaneously regretting my decision to wear a white t-shirt).
The thing about many ridiculously delicious fruits like peaches, nectarines, berries, etc. is that they are at their peak for only a short time before they become a soggy mushy mess of unmet potential. But, have no fear…tis the season for fruit desserts!
I’ve been on a bit of a peach kick lately. Actually I’ve been on a peach kick my whole life. I even enjoy their fuzziness...something I have learned is an acquired taste. That said, you can imagine my enthusiasm yesterday when peaches, along with blueberries, were on my “To Bake” list.
I started my kitchen dance by making a Galette, which is basically an open-faced pie without the bother of a pie plate. It’s a lovely vehicle to show off sunny peaches and bright blueberries. And, it’s a super simple treat to make.
Another reason I love Galettes is that they make sense both as a dessert and as a special weekend breakfast (or mid-day snack) with a steaming cup of tea and the newspaper.
After filling the Galette up with fruit, I still had lots of peaches and blueberries in need of a home. Following my innate love for small things, I piled fruit into a couple of ramekins and topped them with pastry dough that I cut into little star shapes. They ended up looking quite cute…a perfect Fourth of July dessert.
After putting the patriotic pastries into the oven, I was still elbow deep in fruit (apparently 3 lbs of peaches and a pint of blueberries goes a long way). I added some toasted almond slices to the peach-blueberry filling for crunch and then filled a medium sized baking dish with the sweet mixture. I finished the ensemble by creating a quaint lattice top.
Into the oven my lattice topped fruit went, where it bubbled up and juiced out and turned golden brown.
Fruit desserts are divine with a nice big scoop of ice cream, which is not only delicious but also a safeguard for those of us who can’t wait to try a big bite, but don’t want a burnt tongue.
Blueberry and Peach Galette
1 2/3 cups AP Flour
1 tsp salt
1 tsp sugar
8 Tbsp cold unsalted butter, cut into 1/2 inch dice
1/2 cup ice cold water (may not need all of it)
1/2 cup sugar
2 Tbsp corn starch
3 lbs peaches, sliced 1/2 inch think (~6 cups)
1 pint blueberries
juice from 1/2 a lemon
To make the dough, place the flour, salt and sugar into the bowl of a food processor and blend for 10 seconds. Add the cold butter and pulse until butter is cut into medium pieces (~5 seconds). Add cold water slowly and pulse until dough comes together in small, thick clumps (you may need to adjust the amount of water you use). Empty dough onto work surface and bring into a ball. Place in wax paper and then in the fridge to chill for at least 20 minutes.
To make the filling, in a large bowl whisk the sugar with the cornstarch. Gently toss in the peaches and blueberries, and sprinkle with the lemon juice. Let sit for 5 minutes, tossing occasionally.
Roll out the dough on a lightly floured surface to about 12 inches around. Fold the dough in half then half again and place on a parchment lined baking sheet, unfold to make a round.
Pour the fruit and juices (scraping the bowl to make sure you get all the cornstarch) into the pastry and mound it, leaving a 6 inch opening of exposed fruit in the center of the crust. Brush water on the pastry and sprinkle with sugar. Bake on the lower rack of a preheated 375 degree oven for 35-45 minutes.
Saturday, June 6, 2009
Strawberry-Rose Roulade
Oh, the delicious Roulade. This fancy sounding dessert is basically a jellyroll wearing high heels, all dolled up for a night on the town.
For me, making Roulades is soothing. A good thing to embark on when you’re in need of some Zen…kind of like the yoga of the pastry world. There is a gentle nature in their preparation, and they come together fairly quickly.
Another thing I like about Roulades is that they are easy to play with in terms of flavor combinations and tastes. I’m a flavor flirt, so I love this versatility of Roulades.
My first date with a Roulade was full of strawberries and rose…literally. I combined strawberries and rose extract with a cloud of lightly sweetened, softly whipped cream. Then, I layered the Strawberry-Rose Cream onto the Lemon-Scented Genoise Cake that I had baked earlier (in a sheet pan so it was flat).
The final step is to roll up the cake, which creates lovely swirls of cake and filling that are both beautiful and delicious looking. You can’t help but want to dive in for a luscious bite.
To accompany the Roulade, I made a fresh strawberry sauce and sugared rose petals for decoration.
Strawberry-Rose Roulade
6 large eggs
7 oz sugar
2 tsp vanilla extract
3 ½ oz sifted cake flour
¼ tsp salt
3 oz unsalted butter, melted and cooled
1 tsp lemon zest
1 pt strawberries
8 fl oz whipping cream
1 Tbsp sugar
¼ tsp rose extract
Confectioner’s sugar for dusting
Preheat oven to 350 degrees and line a half sheet pan with parchment.
Place eggs and sugar in bowl of stand mixer and set bowl over simmering water. Whisk constantly to keep eggs from scrambling. Heat mixture to about 110 degrees, or until eggs are warm and sugar is dissolved and no longer grainy to the touch.
Whip egg mixture on high speed until very light in color, thick and holds a ribbon (~10 minutes). Blend in vanilla and lemon zest.
Sift flour and salt together 2 times. With a strainer, sift 1/3 of the flour over the egg mixture and gently fold in with a whisk, spatula, bowl scraper, or your hand. Repeat 2 more times until all flour is used. There should be no streaks or lumps of flour. Whisk a generous scoop of batter into the melted butter, incorporating completely. Fold this butter mixture back into the batter. Immediately pour batter into prepared pan, using offset spatula to smooth into an even layer.
Bake cake ~ 15 minutes, until golden firm to touch and a toothpick inserted into center comes out clean.
Slice strawberries thinly (bite-size). Whip the cream, sugar and rose extract together. Fold in strawberries.
Dust top of the cooled cake with the confectioner’s sugar and place a piece of parchment on top. Flip cake out of pan onto a work surface, with a long side facing you. Carefully peal the parchment off the top. Spread filling evenly over the cake, leaving a 1” border all around. Starting with the long side closest to you, fold the edge over the filling, and then roll the cake into a log, pulling up and forward on the bottom parchment to help you roll the cake. When finished, the seam should be on the bottom. Trim ends. Lift roulade onto serving platter. Refrigerate at least 2 hours before slicing.
(From The Art and Soul of Baking by Cindy Mushet, adapted by crc).